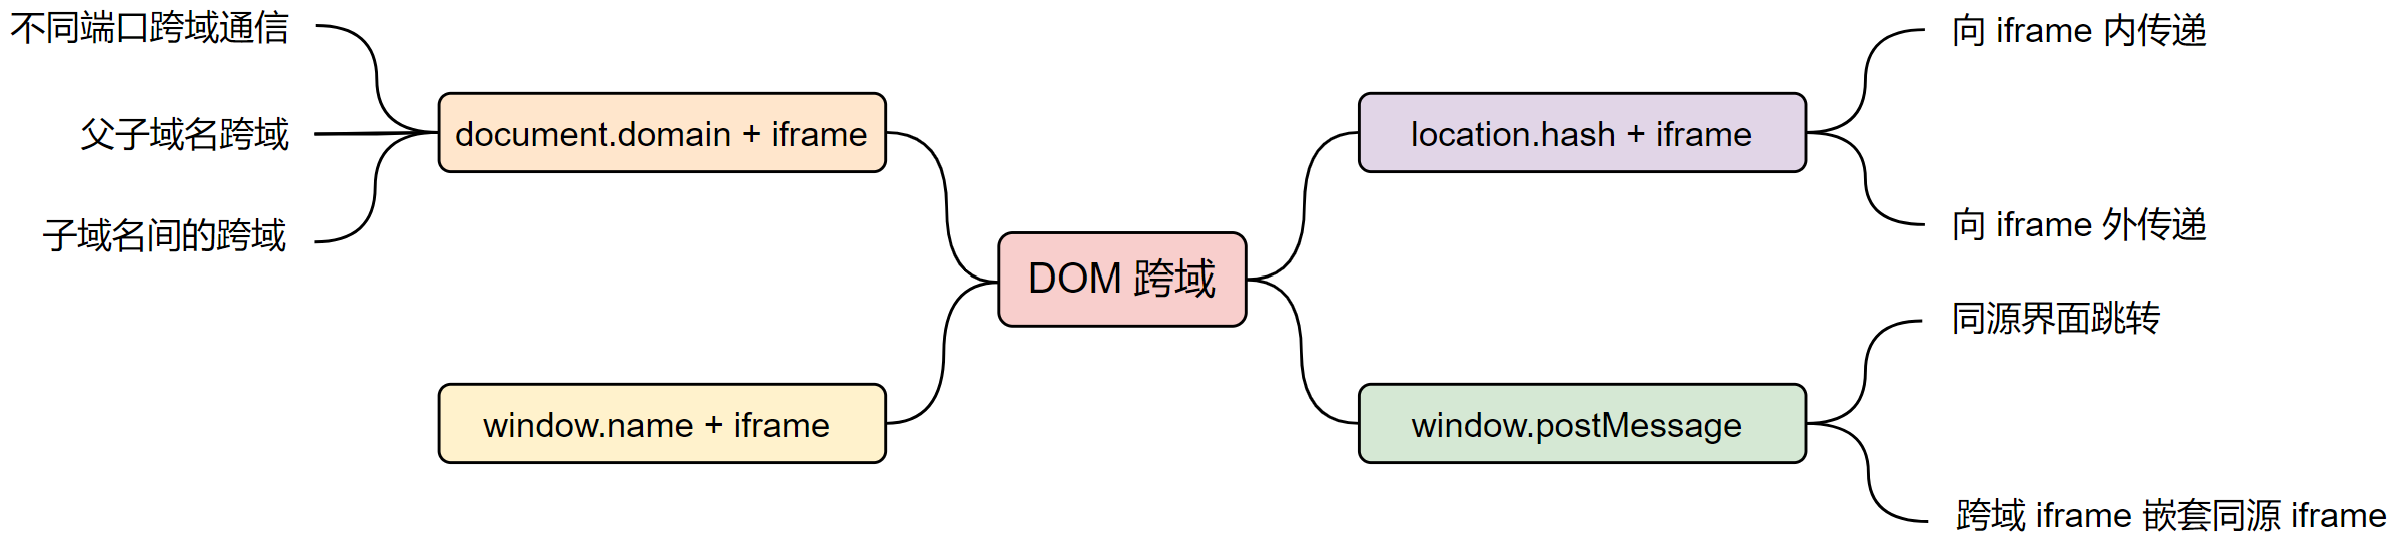
在同源策略中,分别限制了 DOM访问、请求访问和存储访问。在早期浏览器并不成熟的时期,为了访问这些不同的数据,我们就需要使用不同的方法规避同源策略的限制,这就是跨源方法多样化的原因。我们可以将跨源方法分为三个类别。
DOM 跨源共享 DOM 跨源共享主要依靠浏览器提供的 API 方法和嵌套 iframe 实现数据的传递,目前主要有四种方法。
跨源方法
数据传输
大小限制
双向传递
document + iframe
原始
无限制
是
window.name + iframe
字符串
小于2M
否
location.hash + iframe
字符串
浏览器 URL 最大长度
是
window.postMessage
可序列化对象
无限制
是
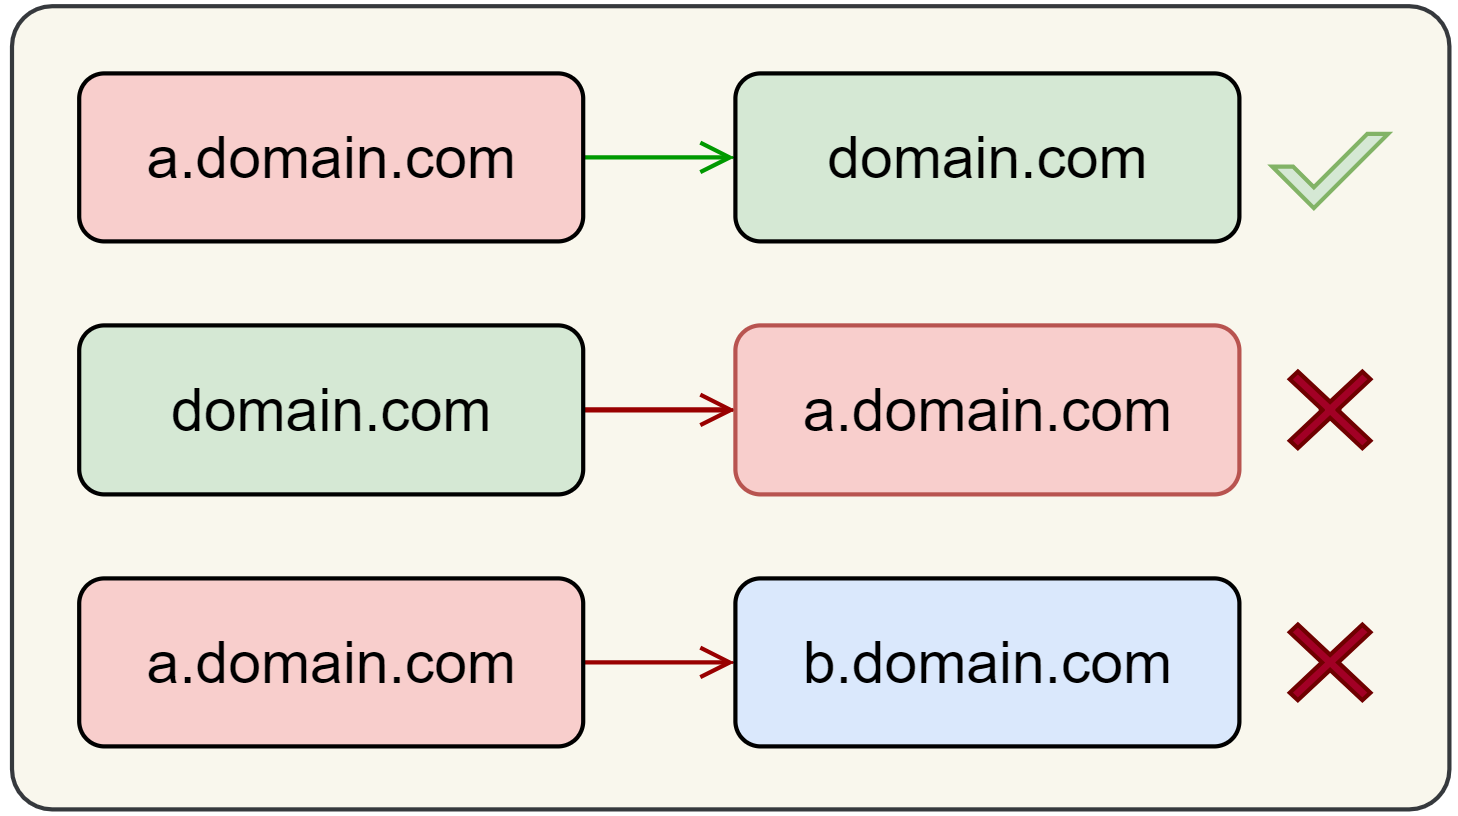
document.domain + iframe 跨源 document.domain 是一个早期浏览器的特性,目前该特性已经被标记为弃用,已不再推荐使用。它允许写入一个域名隐式地修改当前文档的域名。需要注意的是,指定的域名只能是当前域名和父级域名,否则会提示错误。
而且,只能将子域名指定为父域名,而不能指定父域名为子域名,否则也会提示错误。
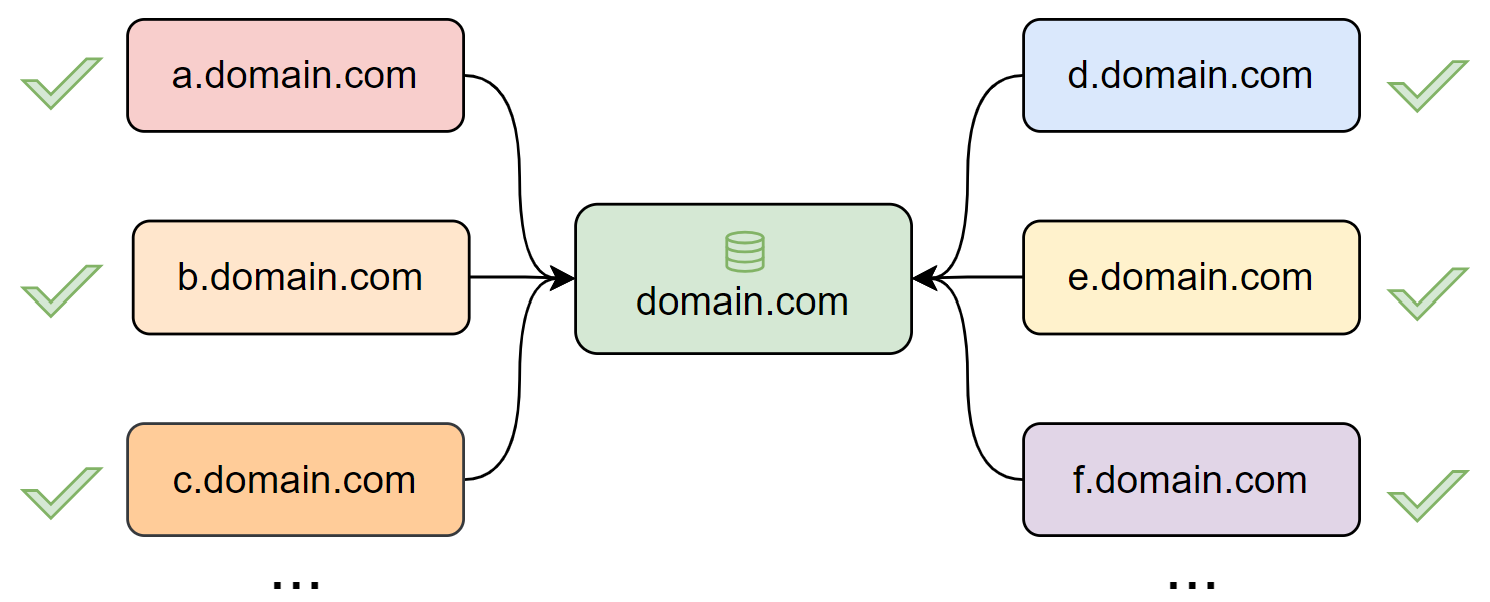
这样,不仅能够让子域名访问父域名,也能够让子域名也访问子域名。但是换个角度一想,如果有为用户提供子域名的托管服务,当用户的子域名设置了 document.domain 后,其他用户拿到子域名后也这样设置,原本两个不相关的网页变成了同源,那么就可以发起跨站攻击。
既然涉及到了安全问题,浏览器可不会惯着它,于是,浏览器标准开始了曲线救国…
为了逐步淘汰这个不安全的特性,浏览器通过 Header 中的一个 Origin-Agent-Cluster 实验性参数进一步限制 document.domain 的更改。当跨源网页文档的 Header 没有指定 Origin-Agent-Cluster: ?0 时,浏览器只会提示一个警告信息,表示更改操作被忽略。
如果要通过 Origin-Agent-Cluster 参数解放 document.domain 的跨源功能,那必须在两个跨源网页文档的 Header 中都指定 Origin-Agent-Cluster: ?0。到这里即使实现了跨源,但是如果没有载入跨源文档就没有意义,所以最终还需要配合 iframe 使用来操作数据。
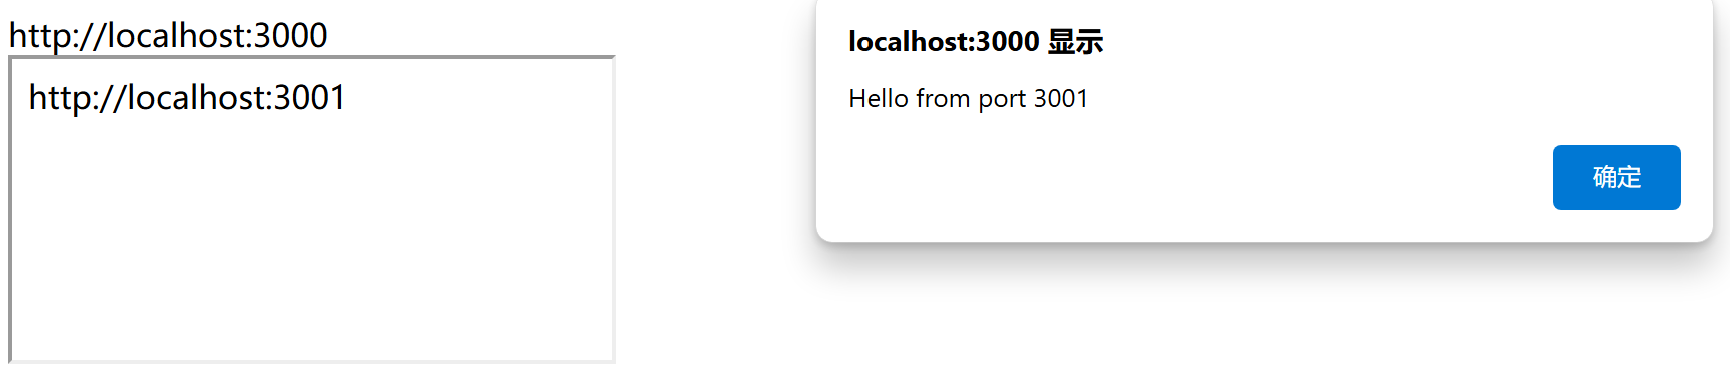
不同端口跨源通信 首先我们我们需要准备两个同域但端口不同的网页,我们可以使用 NodeJS 直接启动两个端口不同的本地服务,例如 http://localhost:3000/ 和 http://localhost:3001/。同时,为了解放 document.domain 的跨源能力,还需要为这两个网站的 Header 都添加 Origin-Agent-Cluster 参数。
1
2
3
4
5
6
7
8
9
10
11
12
13
14
15
16
17
18
19
20
21
22
23
24
25
26
27
28
29
30
31
32
33
34
35
36
37
38
39
40
41
const http = require ("http" );const fs = require ("fs" );const path = require ("path" );const filepath = path.resolve (__dirname, "./" );const readFileAndRespond = (req, res ) => {readFile (filepath + req.url , (err, data ) => {if (err) {writeHead (404 , { "Content-Type" : "text/plain" });end ("File not found" );return ;setHeader ("Origin-Agent-Cluster" , "?0" );write (data);end ();const createServer = (hostname, port, filename ) => {const server = http.createServer ((req, res ) => {readFileAndRespond (req, res);listen (port, hostname, () => {console .log (`Server running at http://${hostname} :${port} /${filename} ` );createServer ("localhost" , 3000 , "root.html" );createServer ("localhost" , 3001 , "sub.html" );const childProcess = require ("child_process" );exec (`start http://localhost:3000/root.html` );
两个服务分别加载一个静态文件,localhost:3000 通过 iframe 载入 localhost:3001,因为端口不同,这两个网页是非同源的。为了实现跨源获取数据,两个网页通过指定同为 localhost 域名,就能在 iframe 中实现跨源通信。
1 2 3 4 5 6 7 8 <body > <div > http://localhost:3001</div > <script > document .domain = 'localhost' ; var sharedVariable = 'Hello from port 3001' ; </script > </body >
1 2 3 4 5 6 7 8 9 10 11 12 <body > <div > http://localhost:3000</div > <iframe src ="http://localhost:3001/sub.html" id ="subFrame" > </iframe > <script > document .domain = 'localhost' ; window .onload = function ( const iframe = document .getElementById ('subFrame' ).contentWindow ; alert (iframe.sharedVariable ); } </script > </body >
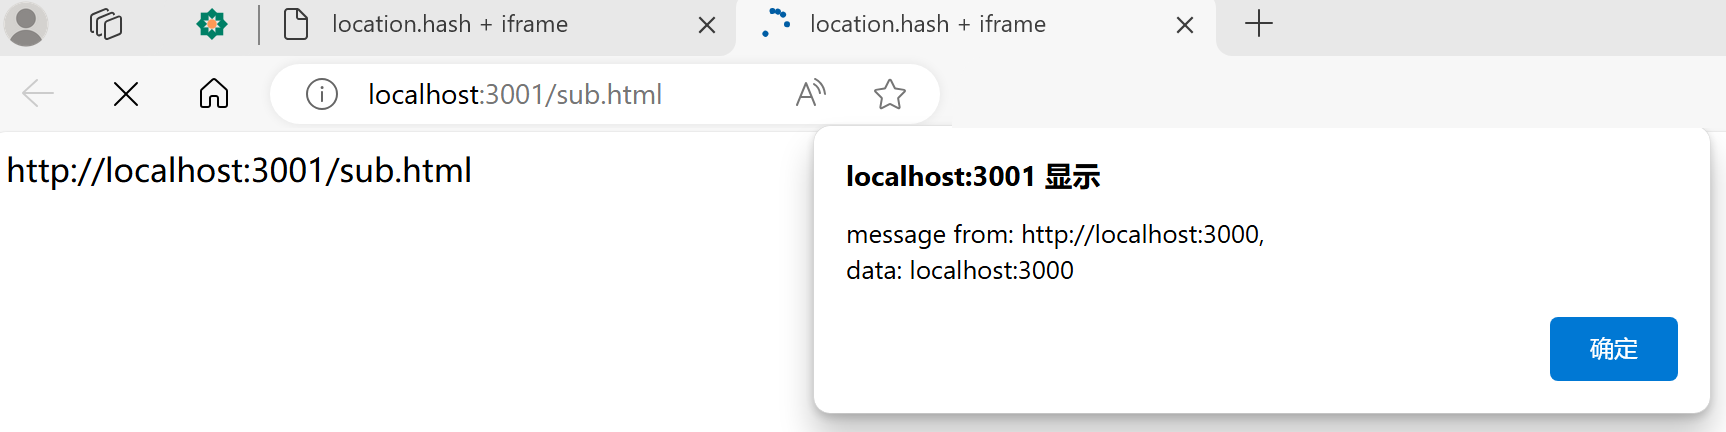
等待界面加载完成后我们从弹窗能看到从 localhost:3000 获取的变量,很明显我们成功跨源拿到了数据。
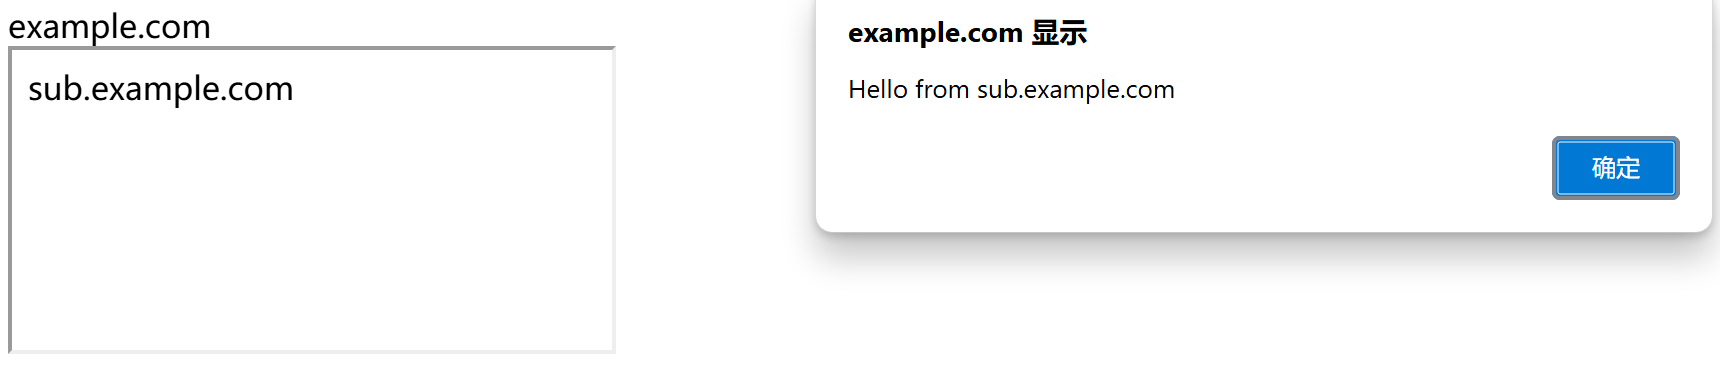
父子域名跨源 假设我们现在有 example.com 和 sub.example.com 两个父子域名,为了在便于本地测试,我们需要在系统的 Host 文件中加入以下配置
1
2
127.0.0.1 example.com
这样我们就能在本地通过域名访问了,这两个域名分别指向本地的 127.0.0.1 和 127.0.0.2 两个不同的服务。然后,我们使用 NodeJS 启动这两个不同域的服务,区别于之前的案例,这里的端口(80)是相同的。同时,为了解放 document.domain 的跨源能力,也为这两个网站的 Header 都添加 Origin-Agent-Cluster 参数。
1
2
3
4
5
6
7
8
9
10
11
12
13
14
15
16
17
18
19
20
21
22
23
24
25
26
27
28
29
30
31
32
33
34
35
36
37
38
39
40
41
const http = require ("http" );const fs = require ("fs" );const path = require ("path" );const filepath = path.resolve (__dirname, "./" );const readFileAndRespond = (req, res ) => {readFile (filepath + req.url , (err, data ) => {if (err) {writeHead (404 , { "Content-Type" : "text/plain" });end ("File not found" );return ;setHeader ("Origin-Agent-Cluster" , "?0" );write (data);end ();const createServer = (hostname, port, filename ) => {const server = http.createServer ((req, res ) => {readFileAndRespond (req, res);listen (port, hostname, () => {console .log (`Server running at http://${hostname} :${port} /${filename} ` );createServer ("127.0.0.1" , 80 , "root.html" );createServer ("127.0.0.2" , 80 , "sub.html" );const childProcess = require ("child_process" );exec (`start http://example.com/root.html` );
两个服务关联的静态文件和上一个案例类似,只需要根据 host 中的具体域名进行指定就可以了。
1 2 3 4 5 6 7 8 9 10 11 12 13 14 <body > <div id ="container" > </div > <iframe src ="http://sub.example.com/sub.html" id ="subFrame" > </iframe > <script > const container = document .querySelector ("#container" ) container.innerText = location.host ; document .domain = 'example.com' ; window .onload = function ( const iframe = document .getElementById ('subFrame' ).contentWindow ; alert (iframe.sharedVariable ); } </script > </body >
1 2 3 4 5 6 7 8 <body > <div > sub.example.com</div > <script > document .domain = 'example.com' ; var sharedVariable = 'Hello from sub.example.com' ; </script > </body >
等待界面加载完成后我们从弹窗能看到从 sub.exi.software 获取的变量,很明显我们也成功跨源拿到了数据。
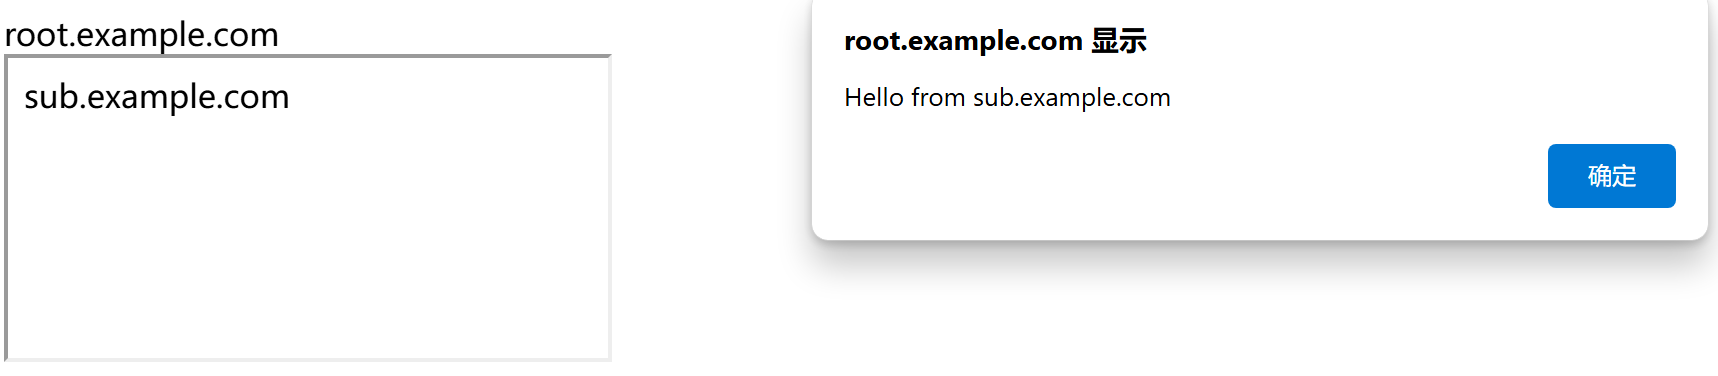
子域名间的跨源 子域和子域之间是否也能做到像父子域名一样,跨源获取数据呢?答案是可以的。
我们再次修改 host 文件,将上一个案例中的父域名改为子域名
1
2
127.0.0.1 root.example.com
然后修改一下 NodeJS 中域名启动代码,让它自动加载 root.example.com/root.html。
1 2 3 const childProcess = require ("child_process" );exec (`start http://root.example.com/root.html` );
可以看到结果是一样的,子域成功通过 iframe 从另一个子域中获取到了数据
document.domain 能够使得两个域名像同源界面一样操作 DOM 数据,作为早期跨源的一种对 DOM 的完全读写方法,能够很简单的实现双向的数据传递。但是在功能更为强大的现代浏览器中,已经不再需要这种宽松的跨源方式了。
window.name + iframe 跨源 window.name 最初是为了在浏览器中命名窗口而设计的,用于给超链接和表单的 target 属性提供指向。实际的浏览器窗口并不需要名称,所以默认情况下 window.name 的值是一个空字符串。
每个窗口的 window 对象都会拥有一个 window.name 属性。而这个属性的特殊之处在于,刷新界面或访问任意网页,属性的值也依然存在。只有当窗口被关闭时,这个值才会随着 window 对象一起销毁。
换句话说,同一窗口中修改过 window.name 的值,会直接保留给后面加载的所有网页,不管是否访问的网页是否同源。我们知道,依靠 iframe 加载的网页窗口同样存在 window 对象,这个性质同样适用,那么只需要先访问跨源网页,将数据留在 window.name 中,再将 iframe 重定向到同源网页,那么就能取得数据了。
首先,我们使用 NodeJS 分类启动两个服务,localhost:3000 和 localhost:3001。
1
2
3
4
5
6
7
8
9
10
11
12
13
14
15
16
17
18
19
20
21
22
23
24
25
26
27
28
29
30
31
32
33
34
35
36
37
38
39
40
const http = require ("http" );const fs = require ("fs" );const path = require ("path" );const filepath = path.resolve (__dirname, "./" );const readFileAndRespond = (req, res ) => {readFile (filepath + req.url , (err, data ) => {if (err) {writeHead (404 , { "Content-Type" : "text/plain" });end ("File not found" );return ;write (data);end ();const createServer = (hostname, port, filename ) => {const server = http.createServer ((req, res ) => {readFileAndRespond (req, res);listen (port, hostname, () => {console .log (`Server running at http://${hostname} :${port} /${filename} ` );createServer ("localhost" , 3000 , "root.html" );createServer ("localhost" , 3001 , "sub.html" );const childProcess = require ("child_process" );exec (`start http://localhost:3000/root.html` );
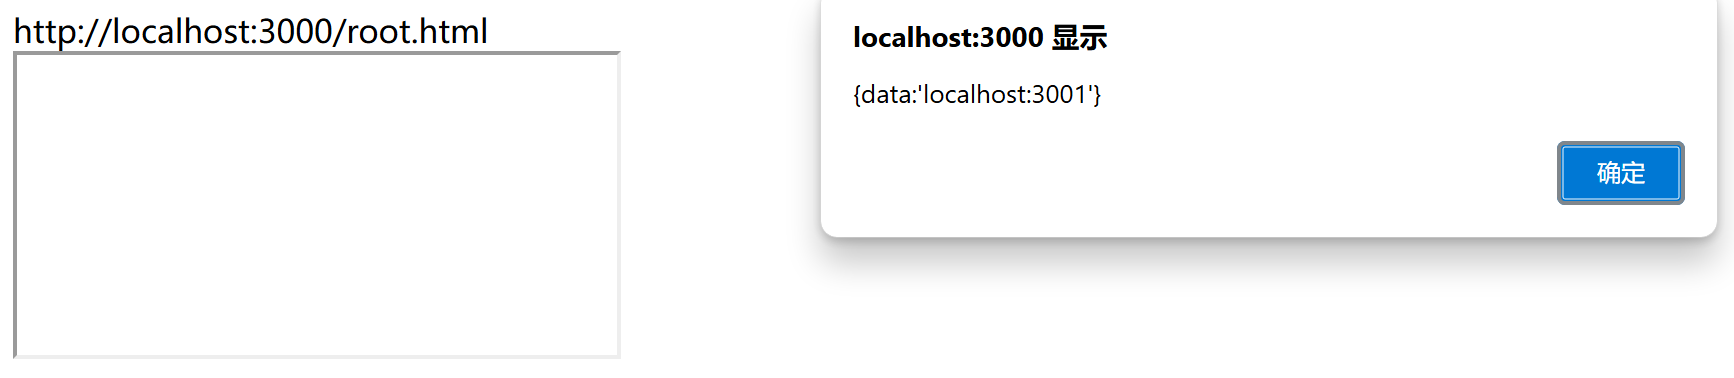
界面中的 iframe 加载完成后,就重定向回同域名的网页,这里我们直接使用了浏览器的空白页(about:blank)。因为同域名的网页并不需要存在,在实际的使用中,我们甚至可以将 iframe 隐藏。
1 2 3 4 5 6 7 8 9 10 11 12 13 14 15 <body > <div > http://localhost:3000/root.html</div > <iframe src ="http://localhost:3001/sub.html" > </iframe > <script > window .onload = function ( const ifr = document .querySelector ("iframe" ); ifr.src = "about:blank" ; ifr.onload = function ( alert (ifr.contentWindow .name ); } } </script > </body >
跨源界面需要做的只有将数据写入 window.name 的操作。
1 2 3 4 5 6 7 <body > <div > http://localhost:3001/sub.html</div > <script > window .name = "{data:'localhost:3001'}" ; </script > </body >
界面的 iframe 会经过两次加载,当加载完成后我们可以看到,数据成功获取到了。
这个方法相对于 document.domain 来说更简单化,但 window.name 的缺点在只能存储不超过 2M 的数据,只适合较小数据的单向跨源传递。
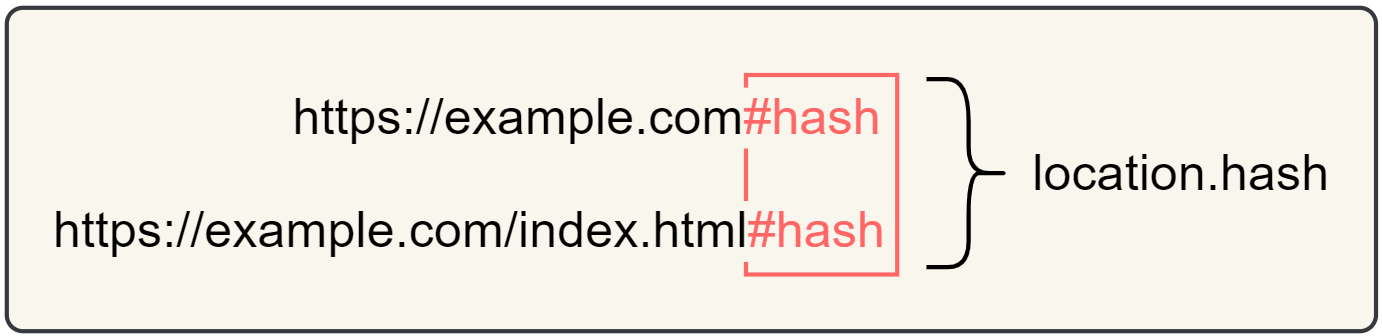
location.hash + iframe 跨源 location.hash 用于返回 URL 后的带有 ‘#’ 的字符片段。首先,我们知道实现锚点定位中这个 Hash 字符很常见,而 Hash 字符的一个特点就是不会使界面刷新,所以我们能够将任意字符作为 Hash 拼接在链接之后。
通过传递 Hash 字符,我们就能进行数据的跨源了,根据传递方式不同,我们分为向 iframe 内部传递和 iframe 向外传递。
首先,我们先使用 NodeJS 做好服务的准备工作,分别启动 localhost:3000 和 localhost:3001 两个服务。
1
2
3
4
5
6
7
8
9
10
11
12
13
14
15
16
17
18
19
20
21
22
23
24
25
26
27
28
29
30
31
32
33
34
35
36
37
38
39
40
const http = require ("http" );const fs = require ("fs" );const path = require ("path" );const filepath = path.resolve (__dirname, "./" );const readFileAndRespond = (req, res ) => {readFile (filepath + req.url , (err, data ) => {if (err) {writeHead (404 , { "Content-Type" : "text/plain" });end ("File not found" );return ;write (data);end ();const createServer = (hostname, port, filename ) => {const server = http.createServer ((req, res ) => {readFileAndRespond (req, res);listen (port, hostname, () => {console .log (`Server running at http://${hostname} :${port} /${filename} ` );createServer ("localhost" , 3000 , "root.html" );createServer ("localhost" , 3001 , "sub.html" );const childProcess = require ("child_process" );exec (`start http://localhost:3000/root.html` );
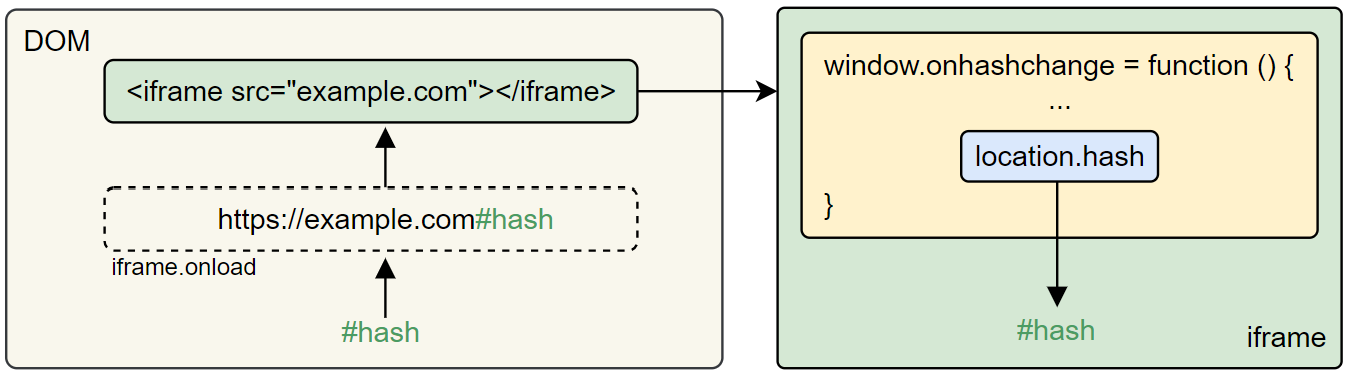
向内传递 在跨源页面中,我们唯一能向 iframe 传递的只有链接,因此我们可以通过链接附加的方式传递数据。此外,window 对象还提供了一个有趣的事件,这个事件可以监听 iframe 加载后链接中 Hash 字符的变化,这使动态传递 Hash 字符传递成为可能。
src 传递
我们可以通过手动创建 iframe 的方式,在写入 iframe 的 src 属性中加入 Hash 字符,然后将其加载。
1 2 3 4 5 6 7 8 9 <body > <div > http://localhost:3000/root.html</div > <script > const ifr = document .createElement ("iframe" ); const hashStr = "#{data:'localhost:3000'}" ; ifr.src = "http://localhost:3001/sub.html" + hashStr; document .body .appendChild (ifr); </script > </body >
当 iframe 加载完成后,iframe 内部的网页就能通过 URL 得到链接中的 Hash 字符。
1 2 3 4 5 6 7 8 9 <body > <div id ="baseUrl" > </div > <script > const baseUrl = document .querySelector ("#baseUrl" ); baseUrl.innerText = location.href ; alert (`iframe receiving data: ${location.hash} ` ); </script > </body >
我们可以看到,在 iframe 还没将内部的 DOM 加载完成时,就已经获取到外部传入的 Hash 字符数据了。
window.onhashchange 传递
window.onhashchange 是一个用于监听链接的 Hash 字符变化的事件,当 Hash 字符变化时,就会触发该事件。因此我们可以在 iframe 内部使用这个事件对 Hash 字符进行监听。
1 2 3 4 5 6 7 8 9 10 11 12 13 14 <body > <div id ="baseUrl" > localhost:3001/sub.html</div > <script > window .onhashchange = function ( const baseUrl = document .querySelector ("#baseUrl" ); baseUrl.innerText = location.href ; setTimeout (() => { alert (`iframe receiving data: ${location.hash} ` ) }, 0 ); } </script > </body >
而外层的界面可以通过直接修改 iframe 的 src 来改变 Hash 字符,从而触发内部的 window.onhashchange 函数。
1 2 3 4 5 6 7 8 9 10 11 <body > <div > http://localhost:3000/root.html</div > <iframe src ="http://localhost:3001/sub.html" > </iframe > <script > window .onload = function ( const ifr = document .querySelector ("iframe" ); const hashStr = "#{data:'localhost:3000'}" ; ifr.src = "http://localhost:3001/sub.html" + hashStr; } </script > </body >
当界面加载完成时,该 Hash 字符的更改触发事件,此时就能从 location.hash 中取出数据了
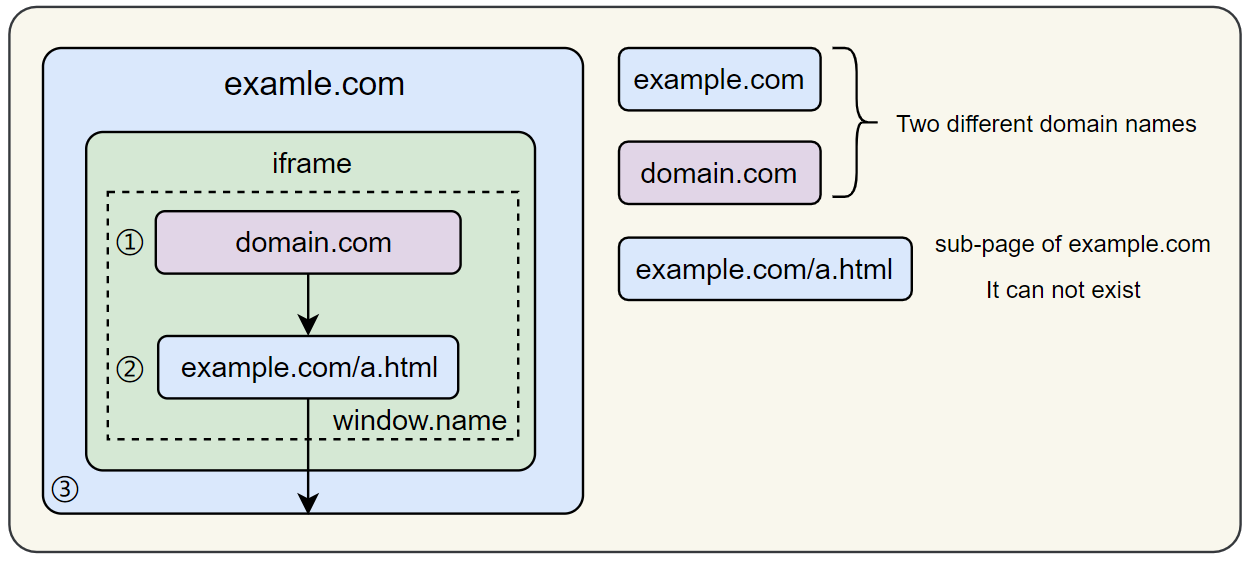
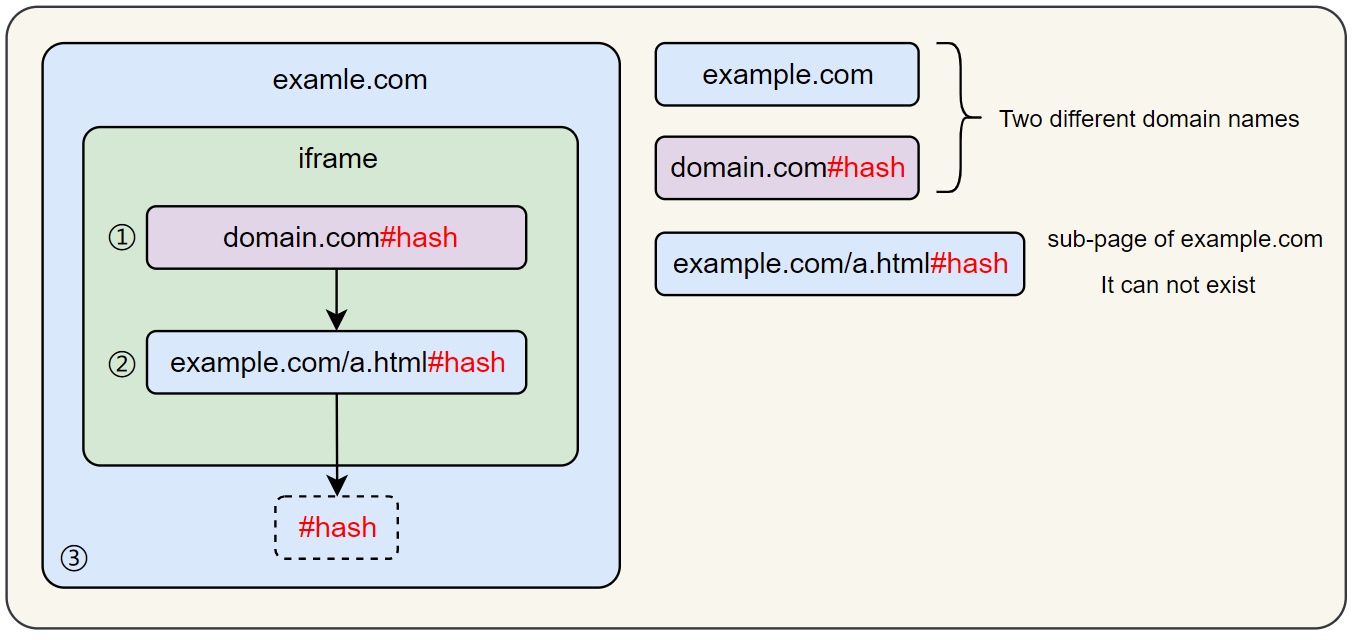
向外传递 这时如果我们想着直接从 iframe 的 src 中把 Hash 字符取出来,但是实际上并不能这么做。iframe 会在其内部包裹一层 DOM,当内部的链接变化时,只会修改内层 DOM 中的链接,外层 iframe 的链接不会被改变。
因为同源策略,iframe 内部的 DOM 链接我们是获取不到的,但是只要同源就能获取,所以我们需要将 Hash 字符二次传递(同源->非同源->同源),我们可以通过下面两种方法实现。
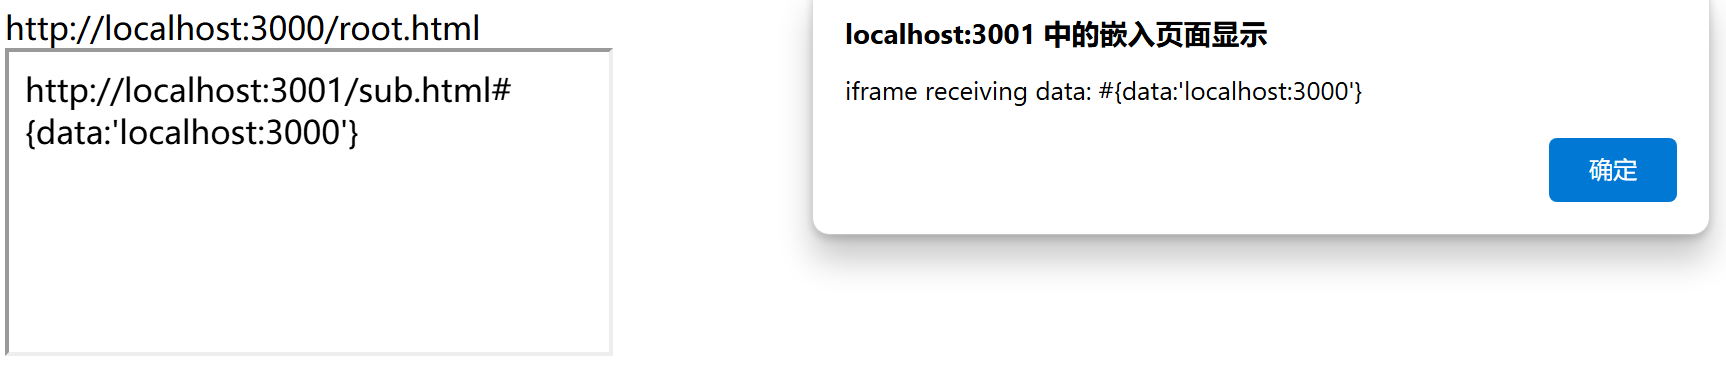
同源界面跳转 我们可以修改 iframe 的 src,使它跳转指向同源界面,并且将 Hash 数据附加在链接之后,在同源下我们就能够直接 DOM 操作获取到这个 Hash 字符的值。这个方法和 window.name 的跨源方式很相似,区别在于我们需要将数据放链接上传递,而不能使用空白页,因为我们需要有一个链接持有 Hash 字符。
首先我们准备好 Hash 字符数据 hashStr,使 iframe 加载时重定向到 http://localhost:3000,并将 hashStr 附加在 URL 中。
1 2 3 4 5 6 7 8 9 <body > <div > http://localhost:3001/sub.html</div > <script > const hashStr = "#{data:'localhost:3001'}" ; const hashWithUrl = "http://localhost:3000" + hashStr; location.href = hashWithUrl; </script > </body >
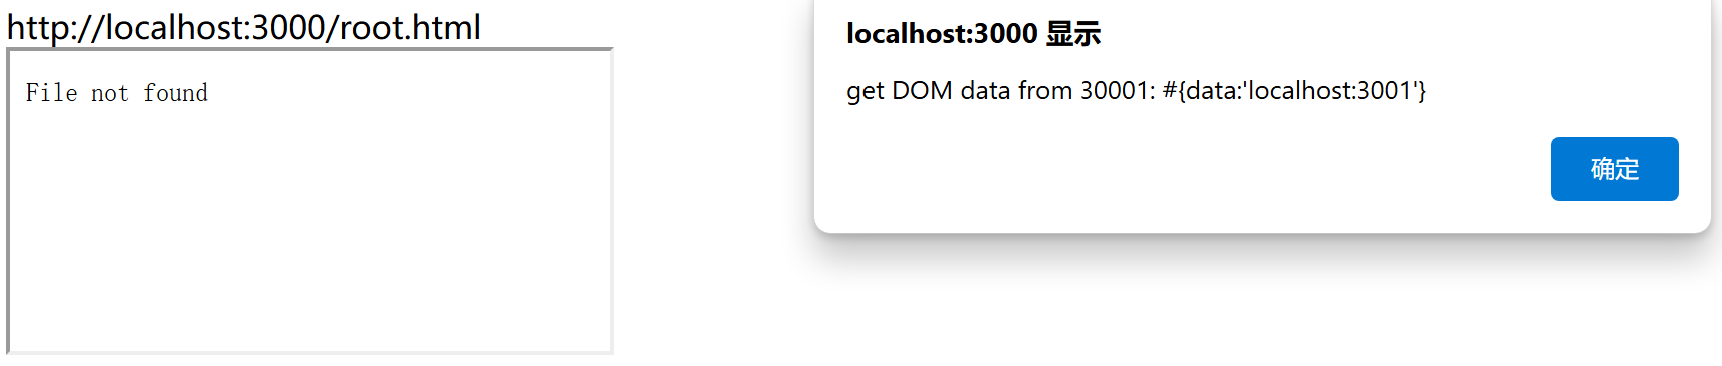
主界面在 iframe 加载完成后,直接通过同源获取 iframe 内部 DOM 中 URL 的 Hash 字符。
1 2 3 4 5 6 7 8 9 10 <body > <div > http://localhost:3000/root.html</div > <iframe src ="http://localhost:3001/sub.html" > </iframe > <script > window .onload = function ( const ifr = document .querySelector ("iframe" ).contentWindow ; alert (`get DOM data from 3001: ${ifr.location.hash} ` ); } </script > </body >
在 iframe 重定向加载完成后,我们能够取到 Hash 字符传递出来的数据了。
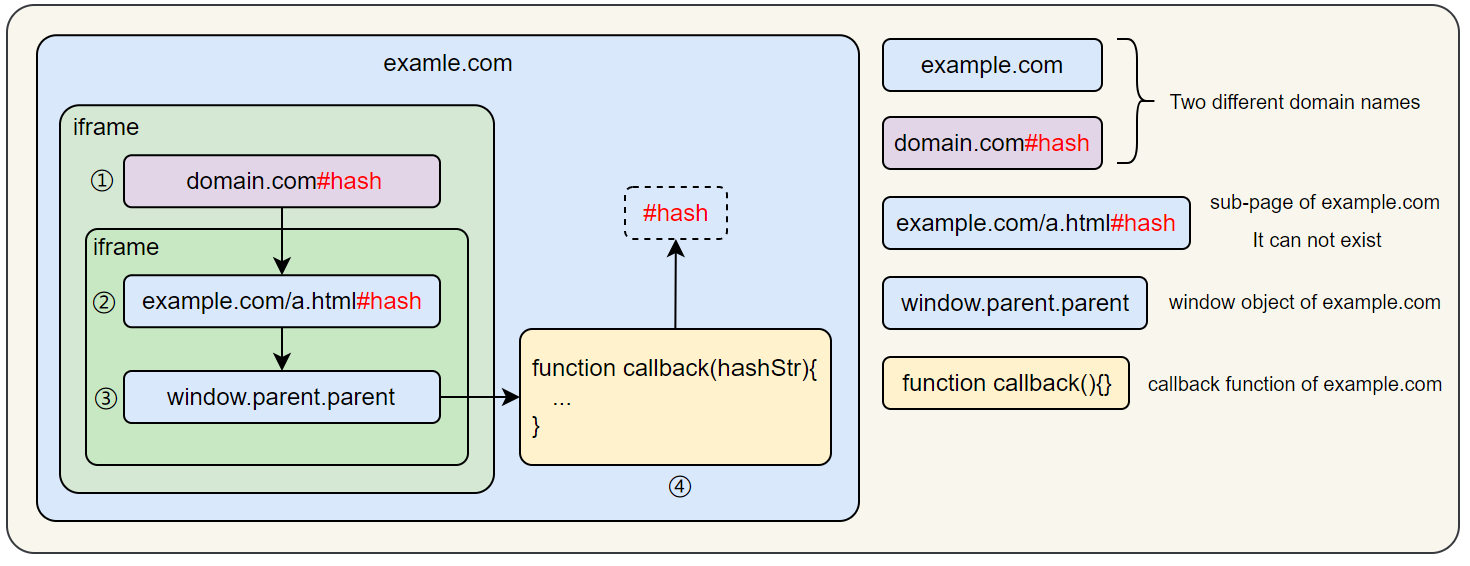
跨源 iframe 嵌套同源 iframe 另一种方式同样使用同源传递的思路,但是这种方式需要嵌套两层 iframe,即在跨源 iframe 中嵌套同源 iframe,然后将 Hash 字符传递给最内层的 iframe。
为了实现这种传递方式,我们总共需要三个界面。首先我们需要在最外层的界面使用 iframe 引用第二个跨源界面,同时创建一个全局的 callback 方法,用于提供给最终的数据传递使用。
1 2 3 4 5 6 7 8 9 <body > <div > http://localhost:3000/root.html</div > <iframe src ="http://localhost:3001/sub.html" > </iframe > <script > function callback (hashStr ) { alert (`get DOM data from localhost:3000's inner iframe: ${hashStr} ` ); } </script > </body >
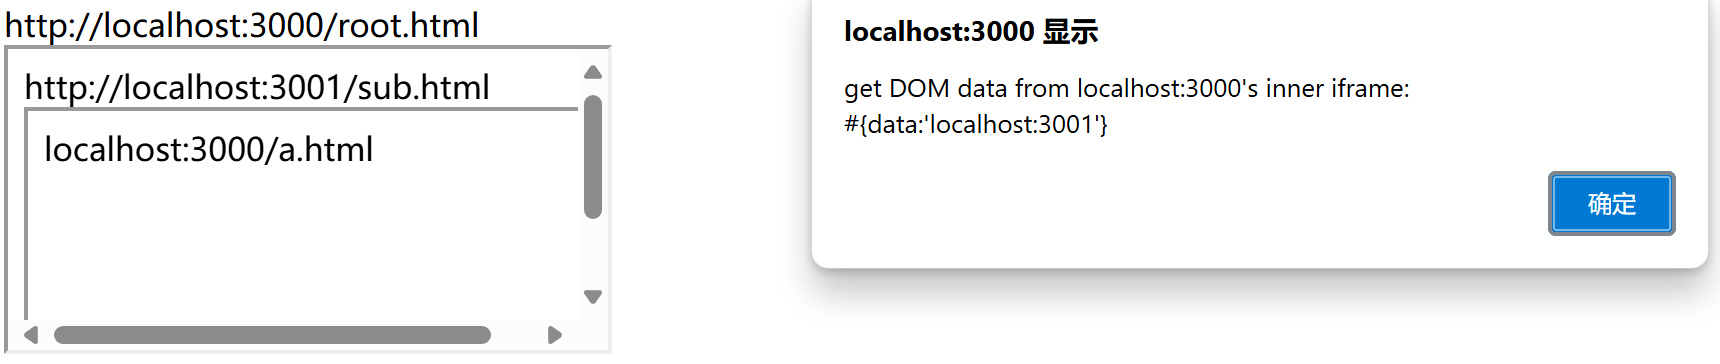
在第二个跨源 iframe 界面中,我们需要手动创建并加载与第一个界面同源的 iframe(第三个界面),并将 Hash 字符传递到它的 iframe 的 src 中即可。
1 2 3 4 5 6 7 8 9 10 11 <body > <div > http://localhost:3001/sub.html</div > <script > const hashStr = "#{data:'localhost:3001'}" ; const hashWithUrl = "http://localhost:3000/a.html" + hashStr; const ifr = document .createElement ('iframe' ); ifr.src = hashWithUrl; document .body .appendChild (ifr); </script > </body >
最后在第三个界面,即最内层的同源 iframe 中,通过 window.parent.parent 的方式获取到最外层同源 DOM,然后调用全局的 callback 方法,将 Hash 字符数据传递给最外层界面。
1 2 3 4 5 6 7 8 9 <body > <div > localhost:3000/a.html</div > <script > const url = location.href ; setTimeout (() => { window .parent .parent .callback (location.hash ); }, 0 ); </script > </body >
经过三次的数据传递,我们最终成功获取到来自跨源 iframe 中的 Hash 字符数据。
虽然 location.hash + iframe 的跨源数据传递方式比较灵活,能够通过多种方式实现数据的双向传递。但是最大的问题是数据暴露在 URL 中明文传输,容易导致数据的安全问题。并且 Hash 作为 URL 中的一部分,数据量也受限于浏览器限制的 URL 长度。
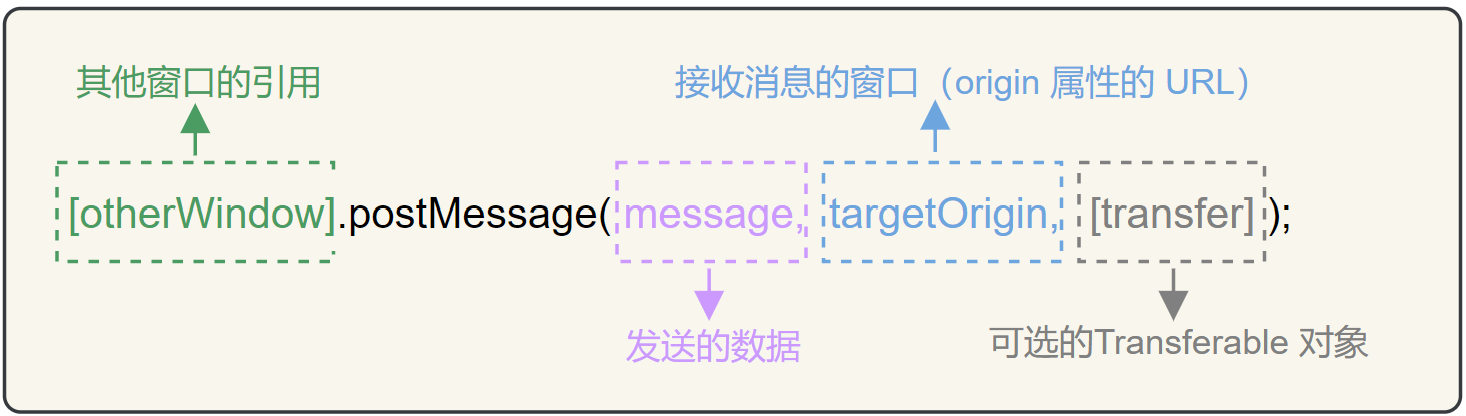
window.postMessage window.postMessage 是HTML5 引入的新特性,目的是用于更安全的传递跨源数据。window.postMessage 方法接收三个参数,发送的数据、接收窗口的 origin 字符和一个 Transferable 对象( 可转移对象 )。
otherWindow 的 window 引用,来源可以是以下方式中的任意一种。
引用
说明
window.open
从当前页面打开的窗口
window.opener
打开当前窗口的父窗口
HTMLIFrameElement.contentWindow
iframe 窗口
window.parent
当前窗口的父窗口
window.frames[index]
当前窗口中索引为 index 的 iframe 窗口
window.top
最顶层窗口
window.self
当前窗口
window.window
当前窗口
document.defaultView
文档所在窗口
window.frameElement.contentWindow
iframe 内部指向的 iframe 窗口
同样的,首先我们使用 NodeJS 启动 localhost:3000 和 localhost:3001 两个服务。
1
2
3
4
5
6
7
8
9
10
11
12
13
14
15
16
17
18
19
20
21
22
23
24
25
26
27
28
29
30
31
32
33
34
35
36
37
38
39
40
const http = require ("http" );const fs = require ("fs" );const path = require ("path" );const filepath = path.resolve (__dirname, "./" );const readFileAndRespond = (req, res ) => {readFile (filepath + req.url , (err, data ) => {if (err) {writeHead (404 , { "Content-Type" : "text/plain" });end ("File not found" );return ;write (data);end ();const createServer = (hostname, port, filename ) => {const server = http.createServer ((req, res ) => {readFileAndRespond (req, res);listen (port, hostname, () => {console .log (`Server running at http://${hostname} :${port} /${filename} ` );createServer ("localhost" , 3000 , "root.html" );createServer ("localhost" , 3001 , "sub.html" );const childProcess = require ("child_process" );exec (`start http://localhost:3000/root.html` );
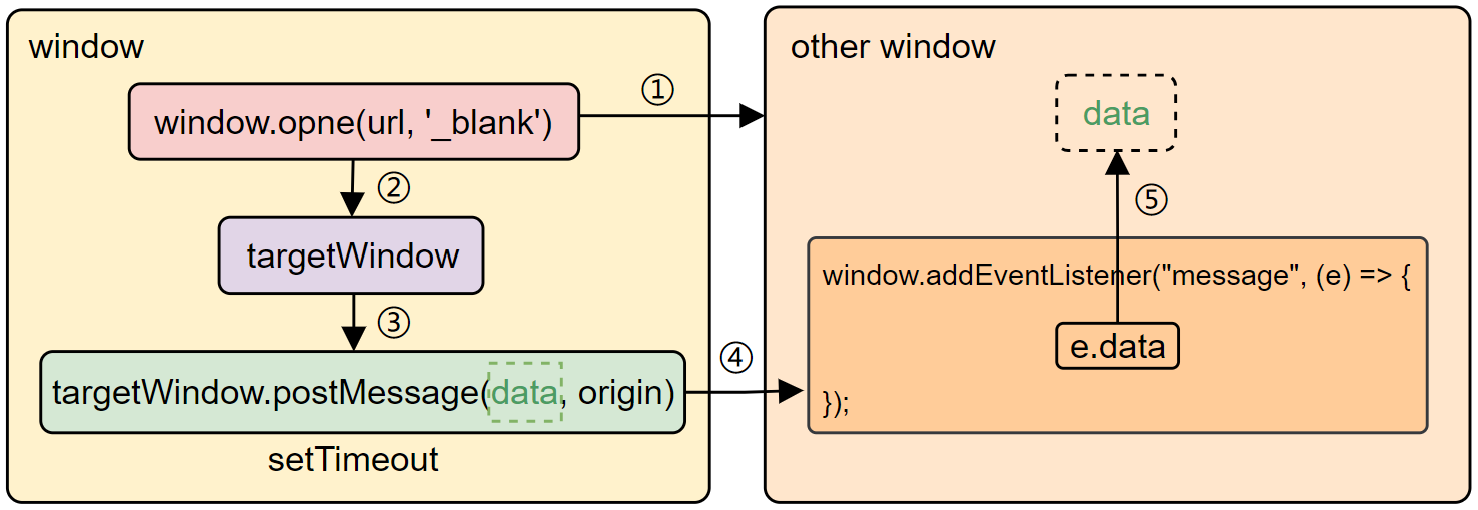
不同窗口-单向通信 为了使用 window.postMessage 发送跨源数据,首先我们必须得到跨源界面的 window 对象。那么对于两个不同的窗口如何获取另一个窗口的 window 的对象,很简单,只需要在第一个窗口打开另一个窗口就行了,例如使用 window.open() 方法,这种方法会返回打开窗口的一个 window 的代理对象(WindowProxy)。
因此,首先我们需要在第一个界面中使用 window.open(url,'_blank') 打开另一个界面,同时得到它的 window 代理对象,然后我们就可以使用 window.postMessage 传递数据了。
1 2 3 4 5 6 7 8 9 10 11 12 <body > <div > http://localhost:3000/root.html</div > <script > const msg = { data : 'localhost:3000' } const target = "http://localhost:3001/sub.html" ; const targetWindow = window .open (target, "_blank" ); setTimeout (() => { targetWindow.postMessage (msg, target); }, 1500 ); </script > </body >
随后我们在跨源界面中编写 window.posMessage 的监听事件,当 window 接收到消息,这个事件就会触发。
1 2 3 4 5 6 7 8 <body > <div > http://localhost:3001/sub.html</div > <script > window .addEventListener ("message" , (e ) => { alert (`message from: ${e.origin} ,\ndata: ${e.data.data} ` ); }) </script > </body >
当第一个界面打开另一个界面加载完毕后,我们就能从传递的对象数据中获取到响应的数据了。
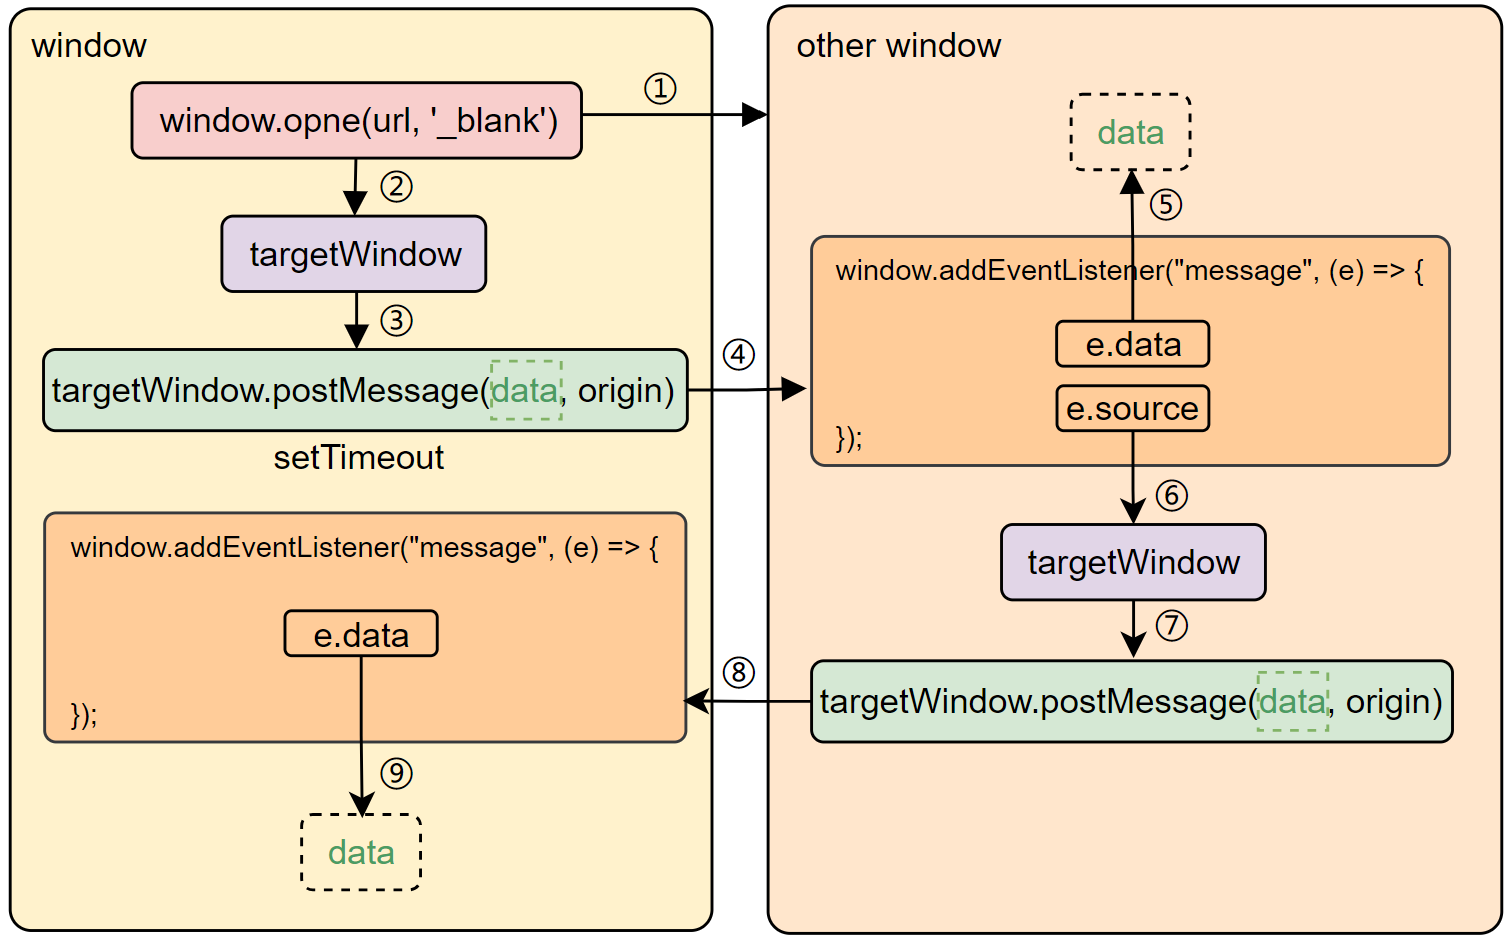
不同窗口-双向通信 通过这种方式,我们还可以在两个界面建立 postMessage 双向的通信。
首先我们需要在之前的基础上,给第一个窗口添加一个 message 事件。
1 2 3 4 5 6 7 8 9 10 11 12 13 14 15 16 <body > <div > http://localhost:3000/root.html</div > <script > const msg = { data : 'localhost:3000' } const target = "http://localhost:3001/sub.html" ; const targetWindow = window .open (target, "_blank" ); setTimeout (() => { targetWindow.postMessage (msg, target); }, 1500 ); window .addEventListener ("message" , (e ) => { alert (`message from: ${e.origin} ,\ndata: ${e.data.data} ` ); }) </script > </body >
然后在另一个窗口中通过事件的 event.source 获取第一个窗口的 window 对象,有了 window 对象我们就能够通过 window.postMessage 反向传递数据了。
1 2 3 4 5 6 7 8 9 10 <body > <div > http://localhost:3001/sub.html</div > <script > window .addEventListener ("message" , (e ) => { alert (`message from: ${e.origin} ,\ndata: ${e.data.data} ` ); const data = { data : "localhost:3001" }; e.source .postMessage (data, e.origin ); }) </script > </body >
当第二个界面接收到 window.postMessage 的数据之后,会再次通过 window.postMessage 传递数据给第一个界面,两个界面先后取得了数据。在传递过程中,我们获得了两个窗口的 window 对象,只需要将其保存下来,就能建立后续的数据传递了。
但是这种方式还是有缺点的。在打开的另一个非同源界面后,我们无法确定界面的加载完成和数据发送的时机,而且并且在界面加载过程中发送的 postMessage 数据会丢失。所以在首次发送时,我们只能设置尽可能久的等待时间来确保数据到达。
此外,浏览器可能会对打开另一个窗口的行为进行拦截,需要手动允许,否则传递会直接中断。
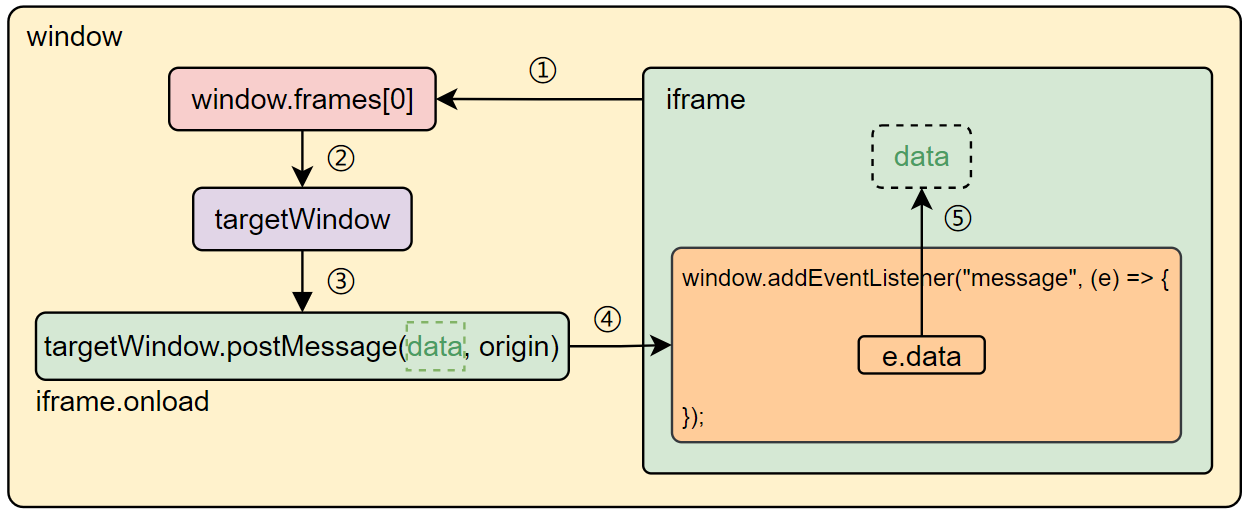
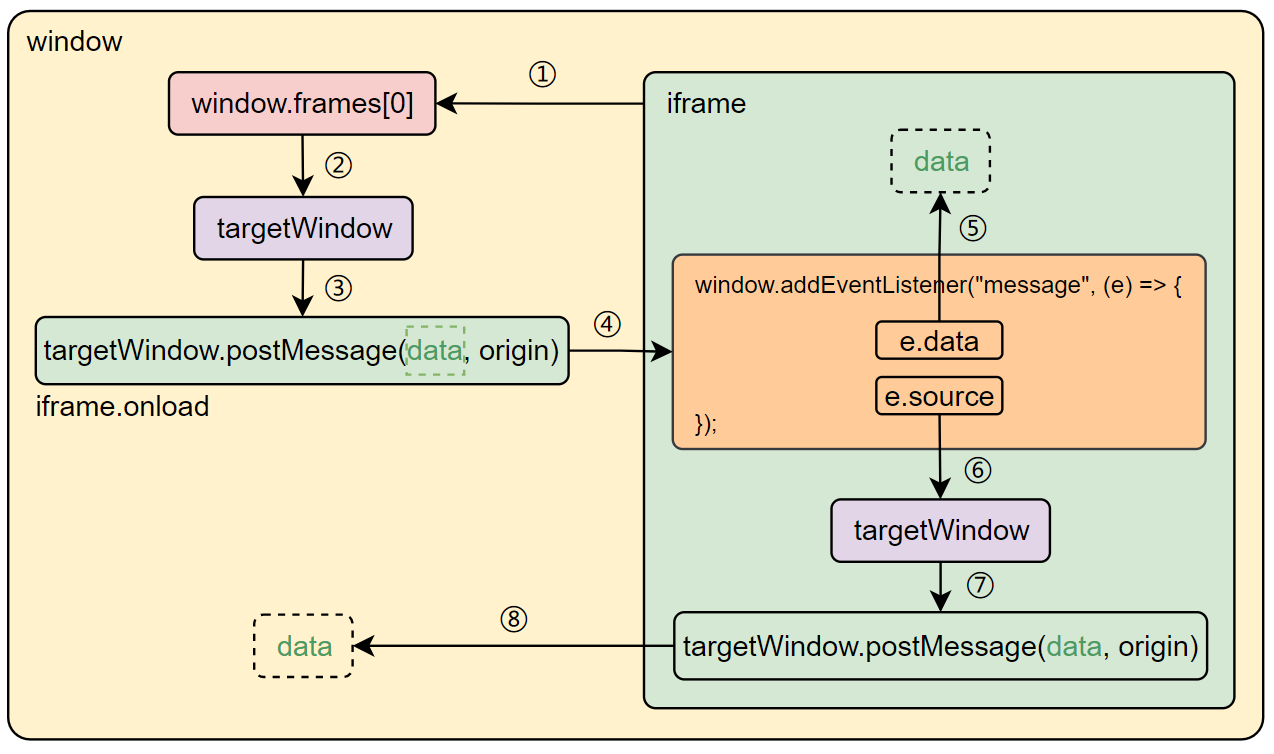
同窗口 iframe 单向通信
首先我们在界面中加载另一个界面的 iframe,当 iframe 加载完成时再使用 window.frames[index].postMessage(msg, target) 发送数据。
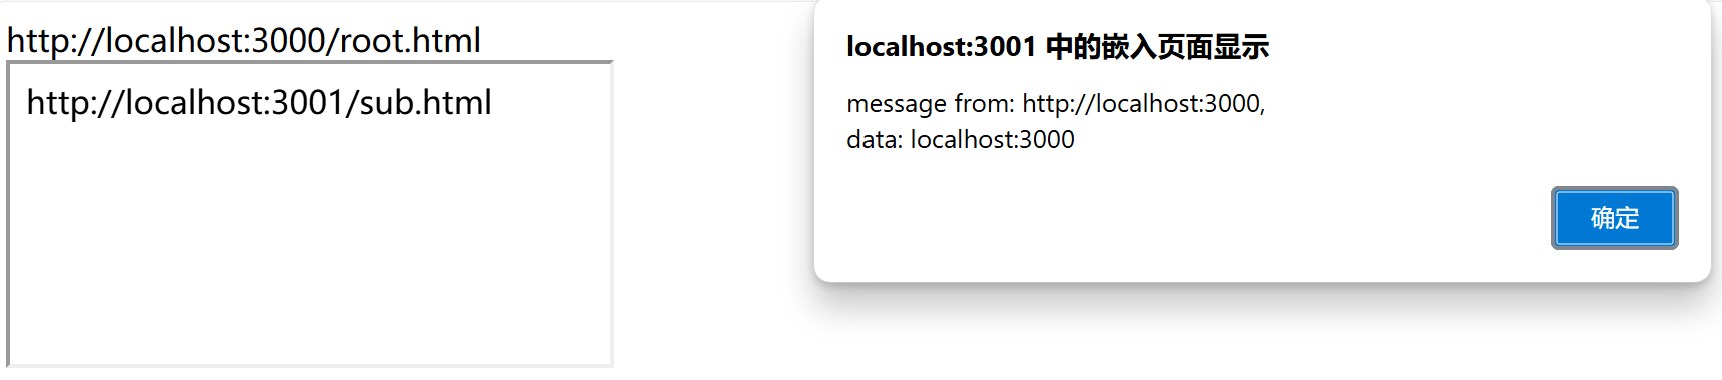
1 2 3 4 5 6 7 8 9 10 11 12 13 14 <body > <div > http://localhost:3000/root.html</div > <iframe src ="http://localhost:3001/sub.html" > </iframe > <script > const msg = { data : 'localhost:3000' } const target = "http://localhost:3001/sub.html" ; const ifr = document .querySelector ("iframe" ); ifr.onload = () => { window .frames [0 ].postMessage (msg, target); } </script > </body >
而在 iframe 界面中,我们只需要为其绑定 message 事件。
1 2 3 4 5 6 7 8 <body > <div > http://localhost:3001/sub.html</div > <script > window .addEventListener ("message" , (e ) => { alert (`message from: ${e.origin} ,\ndata: ${e.data.data} ` ); }); </script > </body >
当 iframe 加载完成时,我们就能通过 event.data 取得数据。
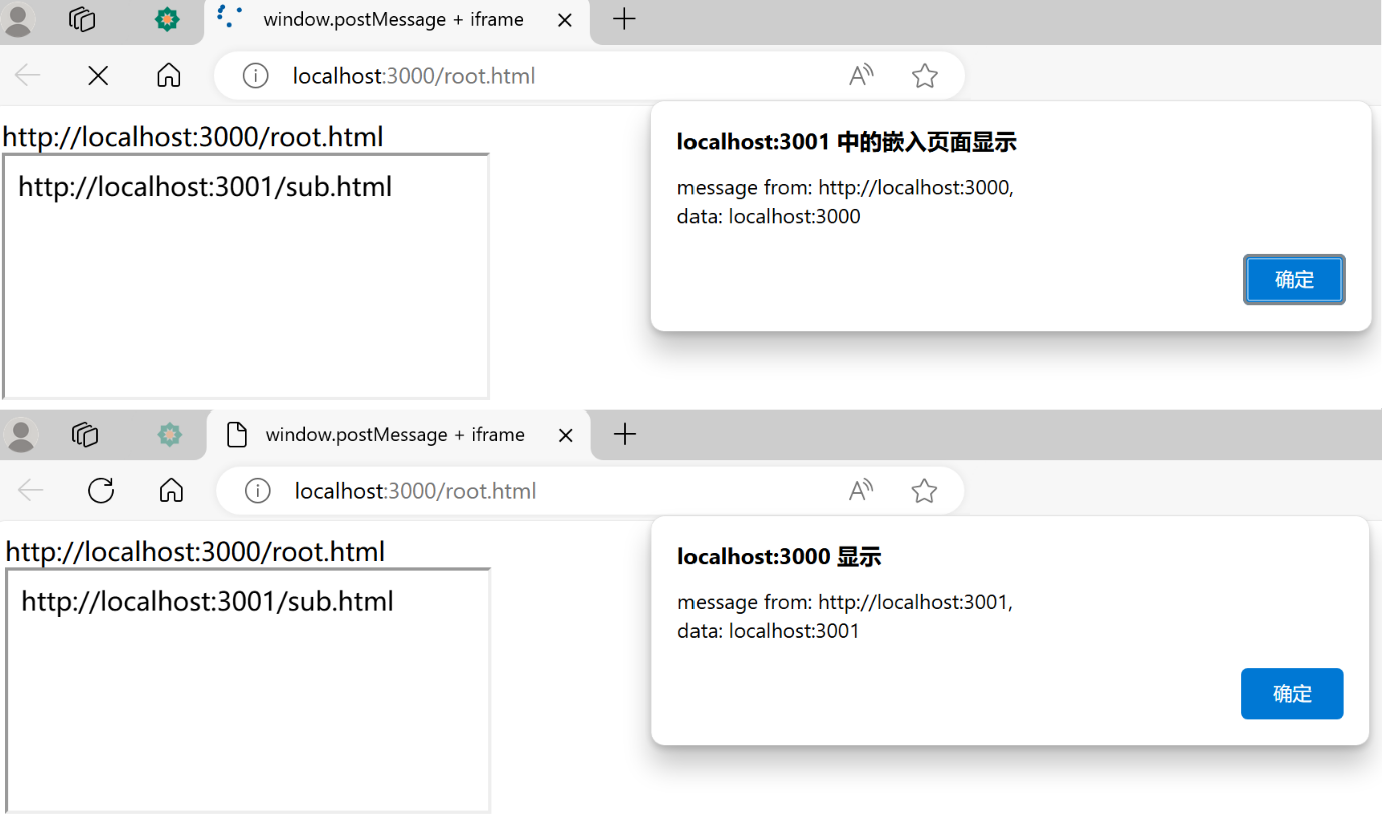
同窗口 iframe 双向通信
首先,我们需要为外层的 window 对象添加一个 message 事件,用于消息传后数据的接收。
1 2 3 4 5 6 7 8 9 10 11 12 13 14 15 16 17 18 <body > <div > http://localhost:3000/root.html</div > <iframe src ="http://localhost:3001/sub.html" > </iframe > <script > const msg = { data : 'localhost:3000' } const target = "http://localhost:3001/sub.html" ; const ifr = document .querySelector ("iframe" ); ifr.onload = () => { window .frames [0 ].postMessage (msg, target); } window .addEventListener ("message" , (e ) => { alert (`message from: ${e.origin} ,\ndata: ${e.data.data} ` ); }) </script > </body >
当数据传递到 iframe 中后,我们就能在 iframe 中通过 event.source 获取到外层的 window 对象了,此时我们再次通过 event.source.postMessage 发送数据。
1 2 3 4 5 6 7 8 9 10 <body > <div > http://localhost:3001/sub.html</div > <script > window .addEventListener ("message" , (e ) => { alert (`message from: ${e.origin} ,\ndata: ${e.data.data} ` ); const data = { data : "localhost:3001" }; e.source .postMessage (data, e.origin ); }); </script > </body >
我们可以看到,当 iframe 取得数据后,外层窗口也获得了数据。
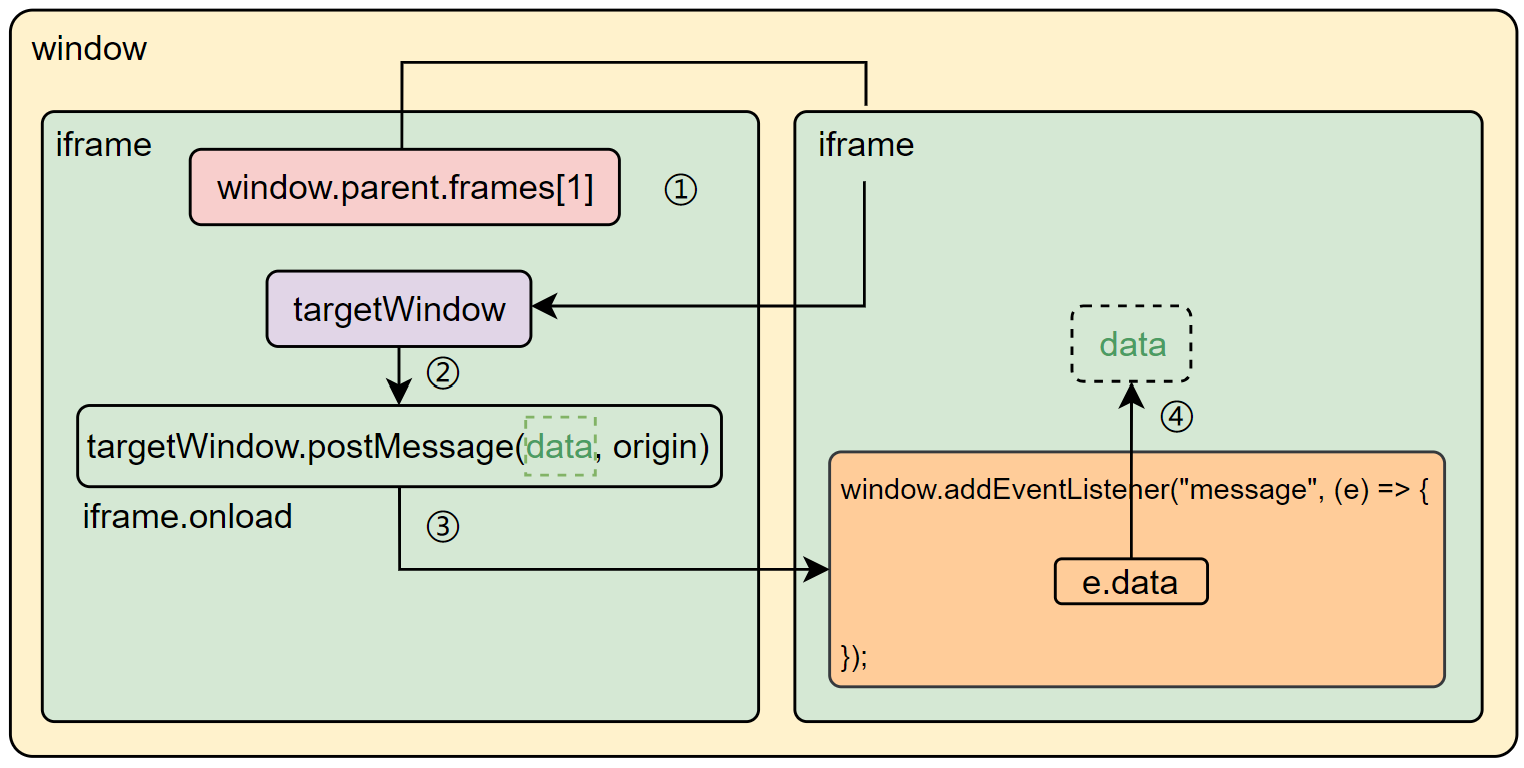
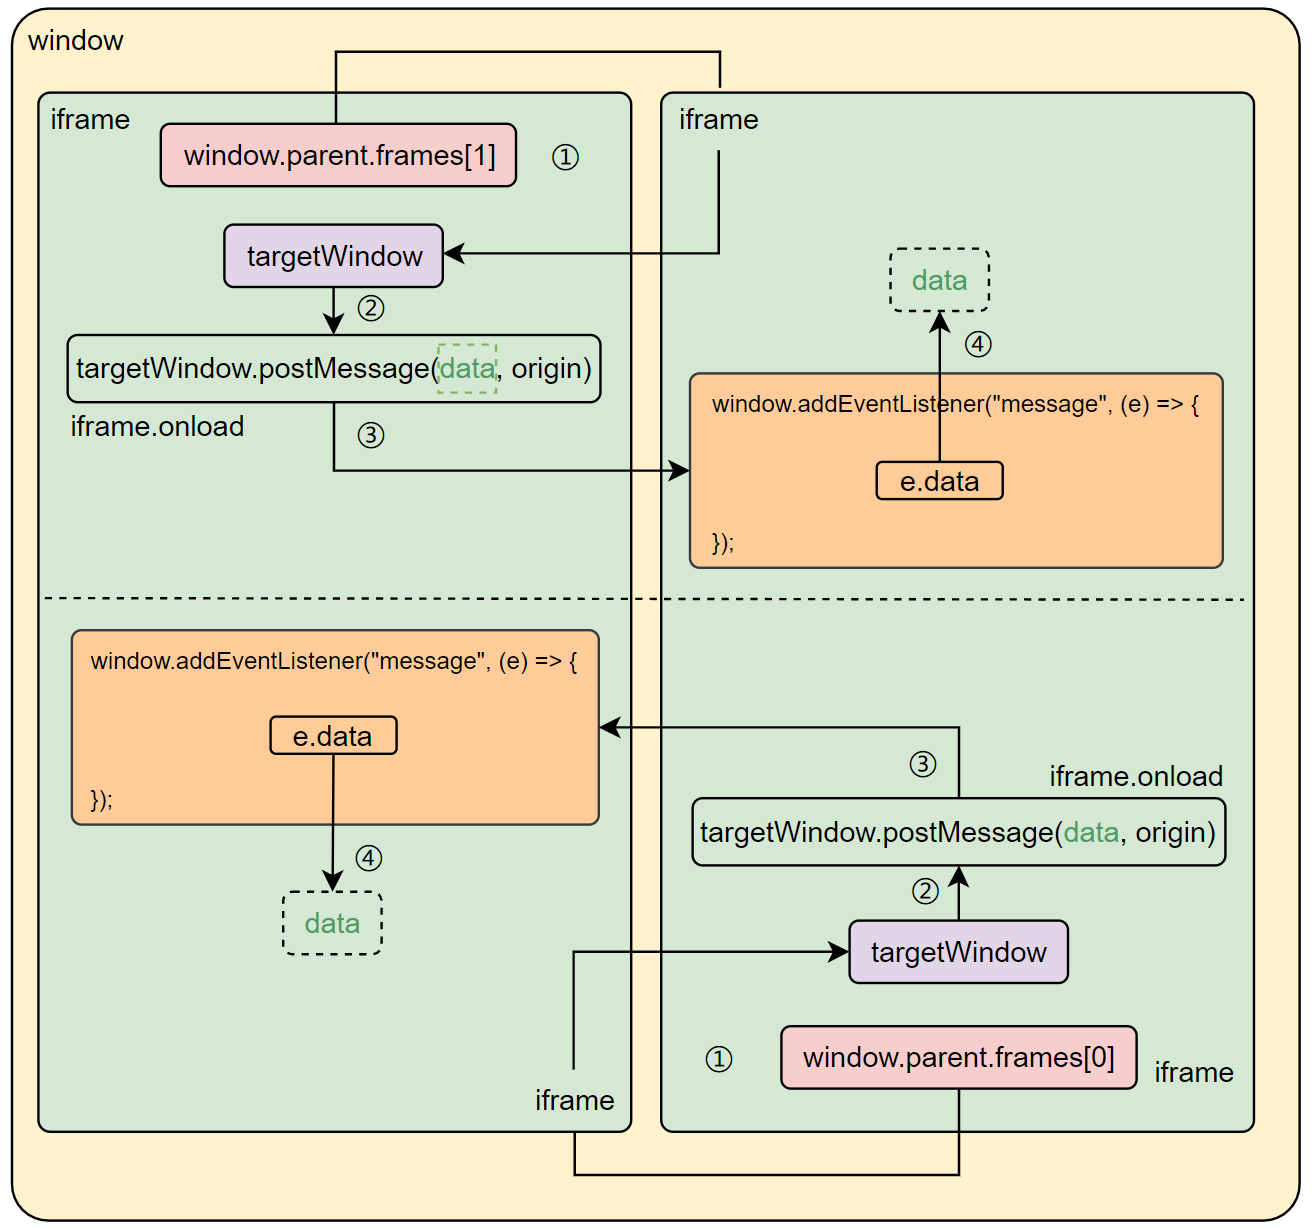
同窗口 iframe 与 iframe 单向通信
首先我们需要在外层窗口引入两个不同源的 iframe。
1 2 3 4 <body > <iframe src ="http://localhost:3000/a.html" > </iframe > <iframe src ="http://localhost:3001/sub.html" > </iframe > </body >
然后我们可以在其中一个 iframe 界面中使用 window.parent.frames[index] 获取到对应 iframe 的 window 对象。
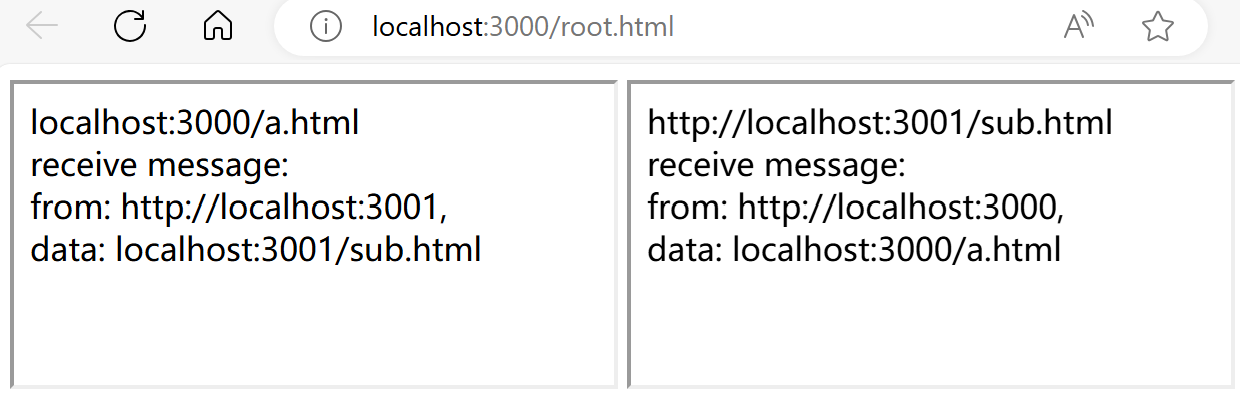
1 2 3 4 5 6 7 8 9 10 11 <body > <div > localhost:3000/a.html</div > <script > window .onload = () => { const data = { data : "localhost:3000/a.html" } const origin = "http://localhost:3001" ; const targetWindow = window .parent .frames [1 ]; targetWindow.postMessage (data, origin); } </script > </body >
另一个 iframe 中只需要绑定好 message 事件就能获取数据了。
1 2 3 4 5 6 7 8 9 <body > <div > http://localhost:3001/sub.html</div > <script > window .addEventListener ("message" , (e ) => { alert (`message from: ${e.origin} ,\ndata: ${e.data.data} ` ); }) </script > </body >
当界面中的 iframe 加载完成后,我们可以看到第二个 iframe 收到了来自第一个 iframe 传递是数据。
同窗口 iframe 与 iframe 双向通信 只要我们在另一个 iframe 中重复单向通信的相同操作,那么我们就能在两个 iframe 之间建立双向的数据传递。
首先我们在之前的基础上在第一个 iframe 界面中为 window 对象添加 message 事件。同时,为了更好的呈现数据的同步获取,我们将数据直接写入界面,取代弹窗显示。
1 2 3 4 5 6 7 8 9 10 11 12 13 14 15 16 17 <body > <div > localhost:3000/a.html</div > <div id ="message" > </div > <script > window .onload = () => { const data = { data : "localhost:3000/a.html" } const origin = "http://localhost:3001" ; const targetWindow = window .parent .frames [1 ]; targetWindow.postMessage (data, origin); } window .addEventListener ("message" , (e ) => { const message = document .querySelector ("#message" ); message.innerText = `from: ${e.origin} ,\ndata: ${e.data.data} ` ; }) </script > </body >
区别于之前的两个窗口之间的双向通信,我们不再需要依靠第一个 iframe 发送消息来传递 window 对象,我们可以随时使用 window.parent.frames[index] 获取需要传递的 iframe 的 window 对象,然后再次使用 window.postMessage 传递数据回第一个 iframe 中。
1 2 3 4 5 6 7 8 9 10 11 12 13 14 15 16 17 <body > <div > http://localhost:3001/sub.html</div > <div id ="message" > </div > <script > window .addEventListener ("message" , (e ) => { const message = document .querySelector ("#message" ); message.innerText = `from: ${e.origin} ,\ndata: ${e.data.data} ` ; }) window .onload = () => { const data = { data : "localhost:3001/sub.html" } const origin = "http://localhost:3000" ; const targetWindow = window .parent .frames [0 ]; targetWindow.postMessage (data, origin); } </script > </body >
因为 DOM 会按照顺序加载 iframe,因此实际显示时第二个接收数据会滞后,但是实际上这两个 iframe 并没有依赖另一个 iframe 传递的 event.source,因此在这种情况下,我们可以在 iframe 完成后的任何时机发送数据。
window.postMessage 在传递过程中会将数据序列化,我们可以不用担心数据传递时的结构,因此我们可以将对象直接进行传递。作为更为现代的跨源方式,这种方式远远比此前的跨源方法灵活和可靠。
此外,虽然我们能够获取到响应窗口的 window 对象,但是这个对象一样受限于同源策略,我们并不能通过这个 window 对象跨源对 DOM 访问。
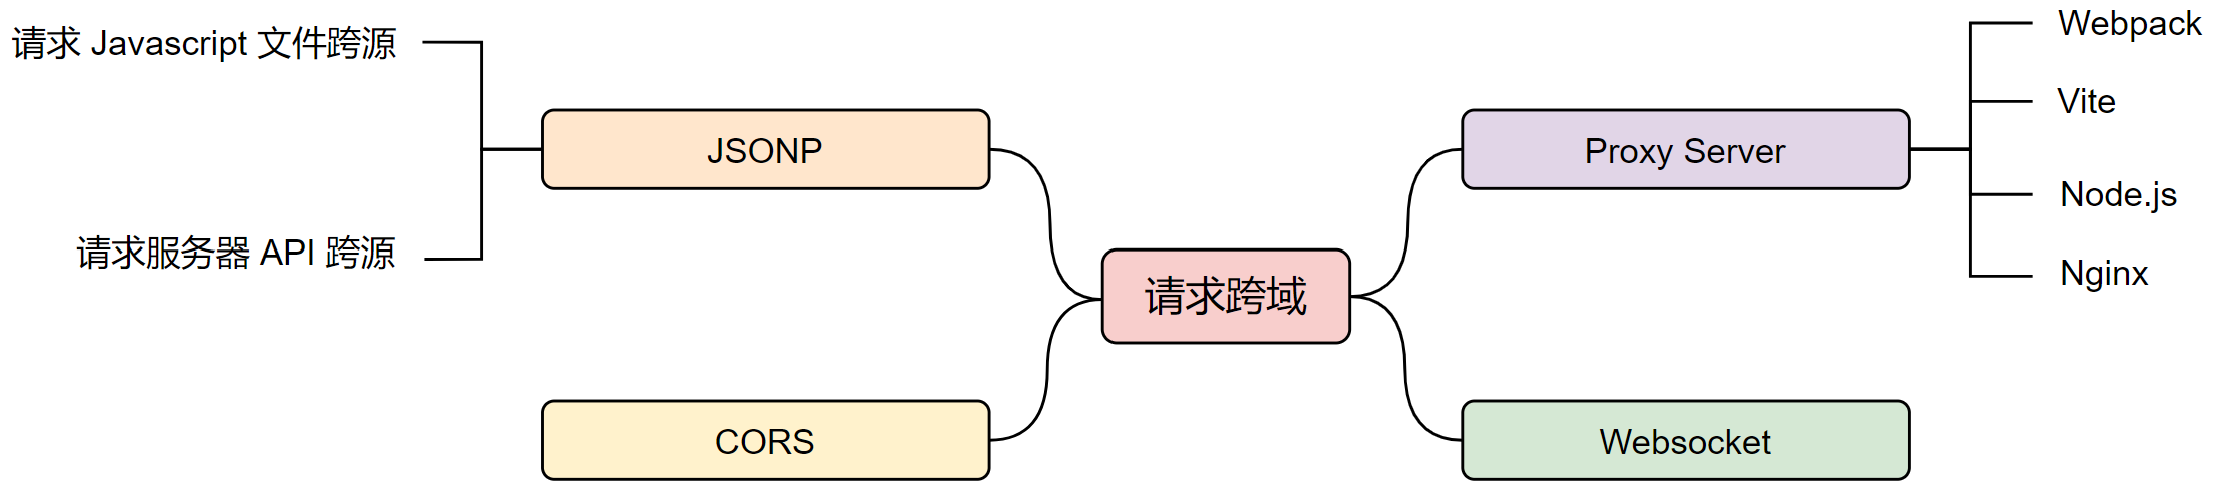
请求跨源共享 请求跨源共享主要依靠服务器与客户端协调或服务器代理实现请求的发送和响应,目前主要有四种方法。
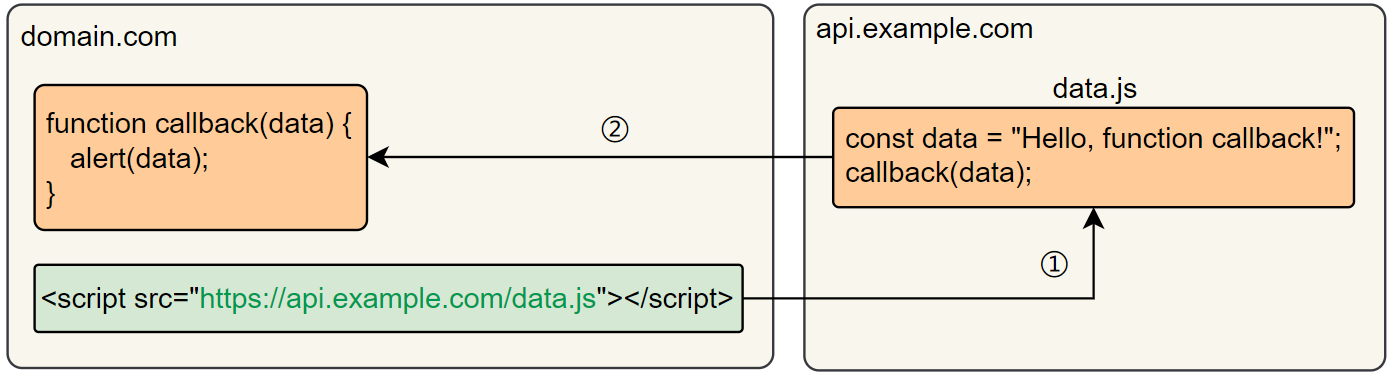
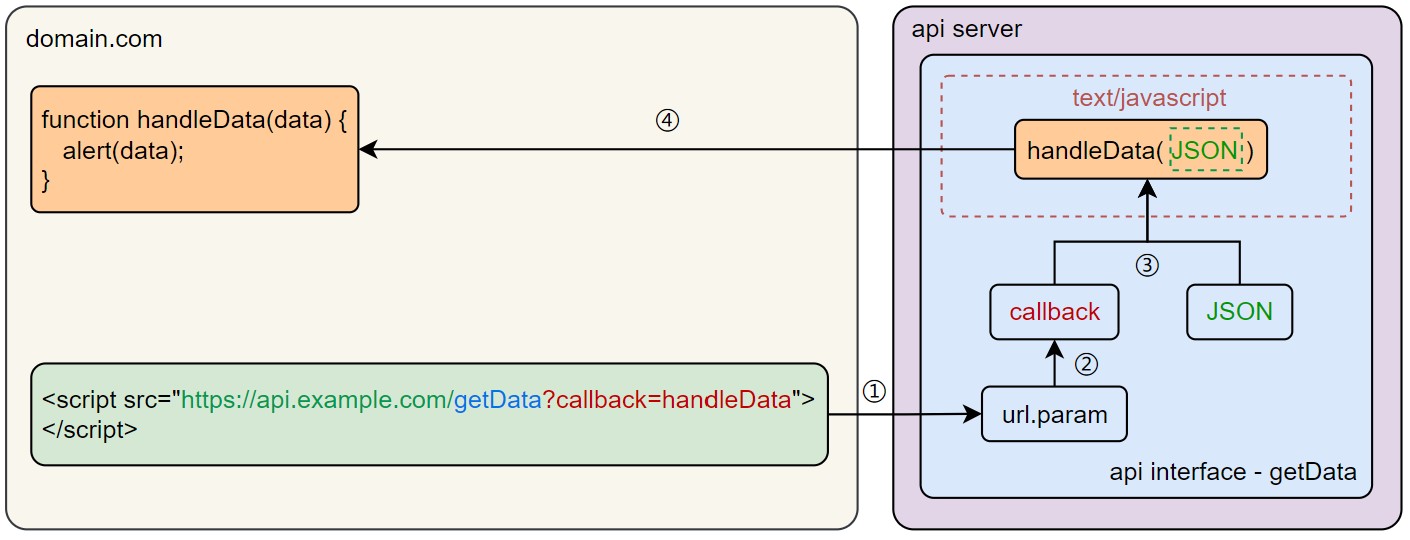
JSONP JSONP(JSON With Padding)表示填充在回调函数中的 JSON 数据。JSONP 利用了 <script> 标签的 src 属性不受同源策略限制的特性,通过在请求中添加一个回调函数的方式来接收数据。
请求 Javascript 文件跨源 我们知道 <script> 标签可以用于加载可执行的 JavaScript,如果我们直接返回一个执行函数时,浏览器就会在当前界面的全局中寻找这个函数然后将其执行。
首先我们直接使用 NodeJS 启动两个服务,一个服务用于启动界面,另一个服务用于模拟请求跨源网页中的 JavaScript 文件。
1
2
3
4
5
6
7
8
9
10
11
12
13
14
15
16
17
18
19
20
21
22
23
24
25
26
27
28
29
30
31
32
33
34
35
36
37
38
39
40
const http = require ("http" );const fs = require ("fs" );const path = require ("path" );const filepath = path.resolve (__dirname, "./" );const readFileAndRespond = (req, res ) => {readFile (filepath + req.url , (err, data ) => {if (err) {writeHead (404 , { "Content-Type" : "text/plain" });end ("File not found" );return ;write (data);end ();const createServer = (hostname, port, filename ) => {const server = http.createServer ((req, res ) => {readFileAndRespond (req, res);listen (port, hostname, () => {console .log (`Server running at http://${hostname} :${port} /${filename} ` );createServer ("localhost" , 3000 , "root.html" );createServer ("localhost" , 3001 , "callback.js" );const childProcess = require ("child_process" );exec (`start http://localhost:3000/root.html` );
在此界面中,我们为其定义一个能够传递参数的全局 callback 函数,然后尝试使用 <script> 去跨源请求另一个网站的 javascript 文件。
1 2 3 4 5 6 7 8 9 <body > <div > http://localhost:3000/root.html</div > <script > function callback (data ) { alert (data) } </script > <script src ="http://localhost:3001/callback.js" > </script > </body >
在跨源网页的 JavaScript 文件中我们不做其他的操作,直接执行 callback(data)。
1
2
const data = "Hello, function callback!" ;callback (data);
当界面加载完成后,我们能够看到全局的 callback 函数确实被执行了,并且函数中的参数也能够成功传递。
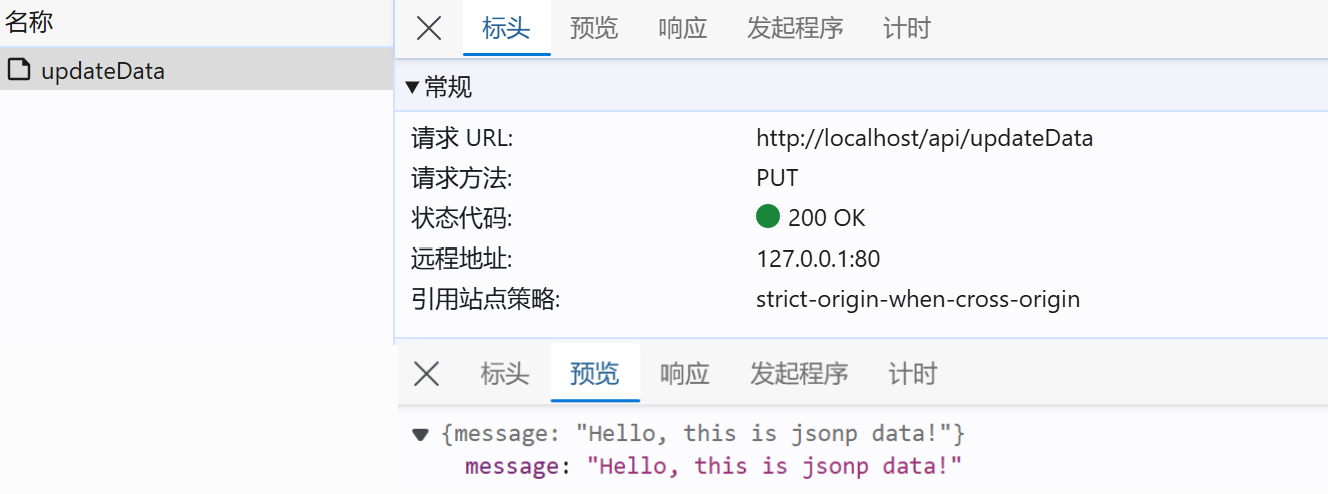
请求服务器 API 跨源 根据请求 Javascript 文件中的原理,我们就能在服务器 API 中模拟这种方式。因为每个界面都有不同的回调函数,为了让服务器得到具体返回的函数名,我们就需要在请求链接中同时传递一个函数名的参数。
我们使用 NodeJS 模拟一个服务器请求的 API,这个 API 会从请求的 URL 中得到函数名,然后我们将需要传递的 JSON 数据和执行函数的字符串进行拼接,同时在响应体中声明 Header 为 {'Content-Type': 'text/javascript'},这样当界面请求完成时,就会得到一个可执行的 javascript 文本。
1
2
3
4
5
6
7
8
9
10
11
12
13
14
15
16
17
18
19
20
21
22
23
24
25
26
27
28
29
30
31
32
33
34
35
36
37
38
39
40
41
42
43
44
45
46
47
48
49
50
51
52
53
54
55
56
57
58
59
60
61
62
63
64
65
66
67
68
69
70
71
72
73
74
75
76
77
const http = require ("http" );const fs = require ("fs" );const path = require ("path" );const url = require ("url" );const filepath = path.resolve (__dirname, "./" );const readFileAndRespond = (req, res ) => {readFile (filepath + req.url , (err, data ) => {if (err) {writeHead (404 , { "Content-Type" : "text/plain" });end ("File not found" );return ;write (data);end ();const writeJSONAndRespond = (req, res ) => {const { pathname, query } = url.parse (req.url , true );if (pathname !== "/api/getData" || req.method !== "GET" ) {writeHead (400 , { "Content-Type" : "text/plain" });end ("Error: No API provided." );return ;const data = { message : "Hello, this is jsonp data!" };const jsonData = JSON .stringify (data);const callback = query.callback ;if (!callback) {writeHead (200 , { "Content-Type" : "application/json" });end (jsonData);return ;const response = `${callback} (${jsonData} );` ;writeHead (200 , { "Content-Type" : "text/javascript" });end (response);const createServer = (hostname, port, filename ) => {const server = http.createServer ((req, res ) => {readFileAndRespond (req, res);listen (port, hostname, () => {console .log (`File server running at http://${hostname} :${port} /${filename} ` );const createApiServer = (hostname, port ) => {const server = http.createServer ((req, res ) => {writeJSONAndRespond (req, res);listen (port, hostname, () => {console .log (`API server running at http://${hostname} :${port} /api/getData` );createServer ("localhost" , 3000 , "index.html" );createApiServer ("localhost" , 8080 );const childProcess = require ("child_process" );exec (`start http://localhost:3000/index.html` );
在界面中我们定义好全局的回调函数 handleData,并且在 <script 中的 src 参数中调用服务器 API,同时将回调函数名通过链接的查询参数一起传递。
1 2 3 4 5 6 7 8 9 <body > <div > localhost:3000, please check the console for the API request.</div > <script > function handleData (data ) { console .log (data); } </script > <script src ="http://localhost:8080/api/getData?callback=handleData" > </script > </body >
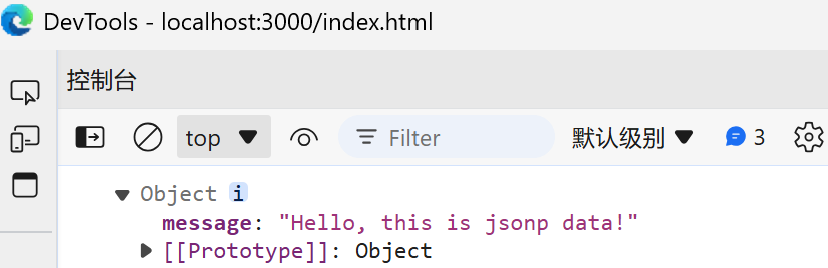
当界面的请求完成时,我们就能在控制台看到通过 JSONP 返回的 JSON 对象数据。
JSONP 利用了 <script> 标签的跨源特性,由于 <script> 标签只支持 GET 请求,因此 JSONP 也只能用于 GET 请求,不能用于 POST 或其他类型的 HTTP 请求。
同时,因为任何界面都可以发起 JSONP 请求,如果服务器端没有进行适当的验证和限制,就可能存在敏感数据被泄露的风险。
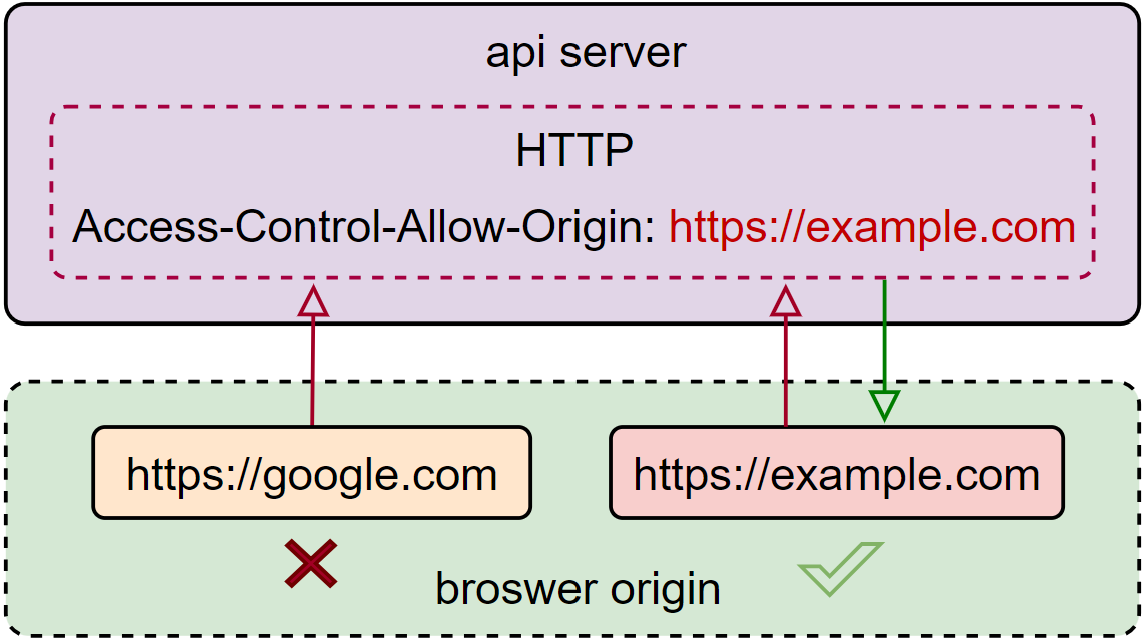
CORS CORS (Cross-Origin Resource Sharing) 跨源资源共享是一种请求机制,它允许服务器指定除自己外的其他源请求资源,从而使得浏览器能够加载来自服务器的跨源资源。
在服务器中,支持 CORS 需要添加额外的 HTTP 头,用于指定允许访问的源。当服务器指定 Access-Control-Allow-Origin 参数时,浏览器会根据这个参数判断请求的源是否匹配,当源不匹配时,就会提示请求跨源错误。
在浏览器中,CORS 将请求分为了简单请求 和非简单请求。简单请求不做处理,直接向服务器发送请求。而对于非简单请求,浏览器会在先发起预检请求 ,向服务器询问更完整的请求许可条件,当请求符合服务器列举的条件时,才向服务器发送实际请求。
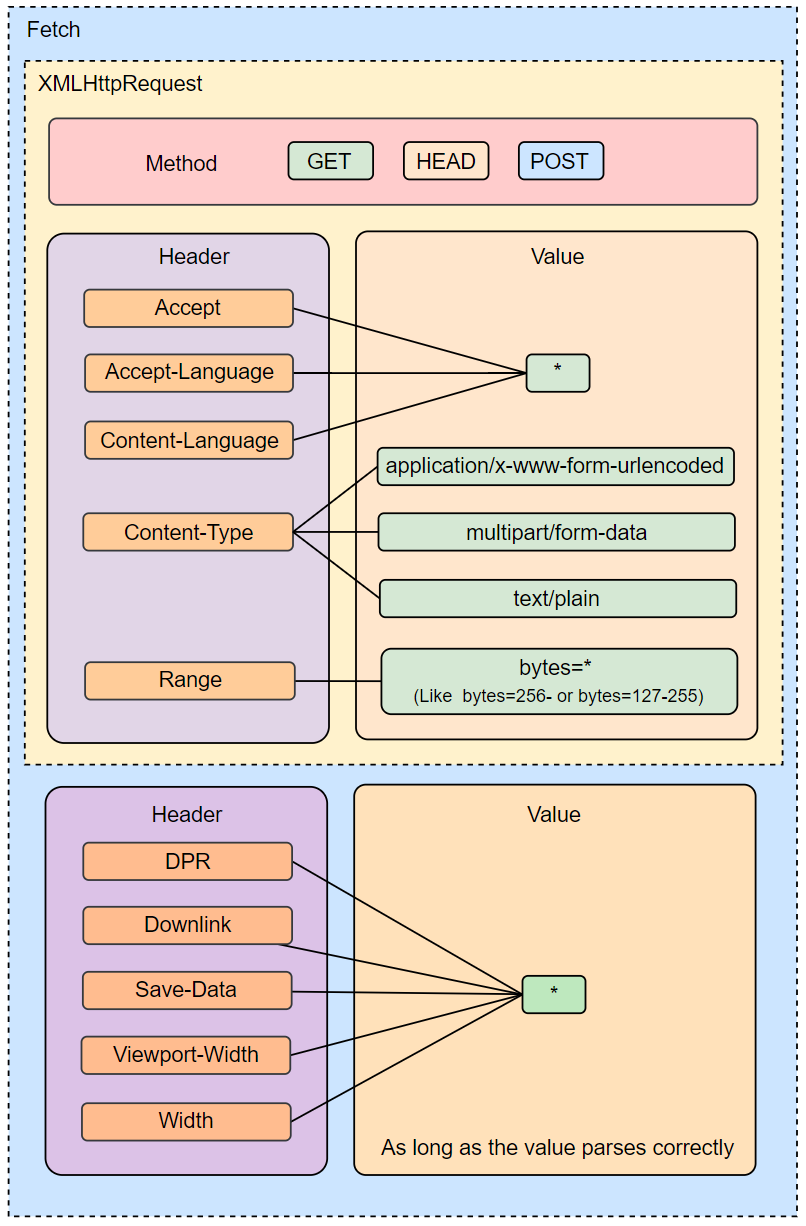
简单请求(Simple / Safelisted Request) 是指遵循浏览器的默认安全请求条件的一种请求,它避免了触发更严格的预检请求,使跨域请求的过程更为简单化。
简单请求的默认规则如下:
对于请求的方法,只能是 GET、HEAD和 POST 方法之一。
HTTP 头信息和对应值只能存在以下几种:
Header
Value
说明
Accept
*/*表示客户端能够理解的内容类型,以 MIME 类型的形式表达
Accept-Language
*
表示客户端所偏好的自然语言和区域设置
Content-Language
*
一个 entity header(实体消息首部),用来说明访问者希望采用的语言或语言组合,用户就可以根据自己偏好的语言来定制不同的内容。如果不指定,默认文件内容提供给所有语言的访问者使用。
Content-Type
text/plain、multipart/form-data、application/x-www-form-urlencoded
指示资源的原始媒体类型
Range
bytes=*,只允许简单的范围标头值(如 bytes=256- 或 bytes=127-255)
一个请求首部,告知服务器返回文件的哪一部分。在一个 Range 首部中,可以一次性请求多个部分,服务器会以 multipart 文件的形式将其返回
对于 XMLHttpRequest 发起的请求,返回的 XMLHttpRequest.upload 对象属性上没有注册事件监听器。
换句话说,一个 XMLHttpRequest 实例 xhr,没有通过调用 xhr.upload.addEventListener() 方法,实现该上传请求的监听。
请求中没有使用 ReadableStream 对象。
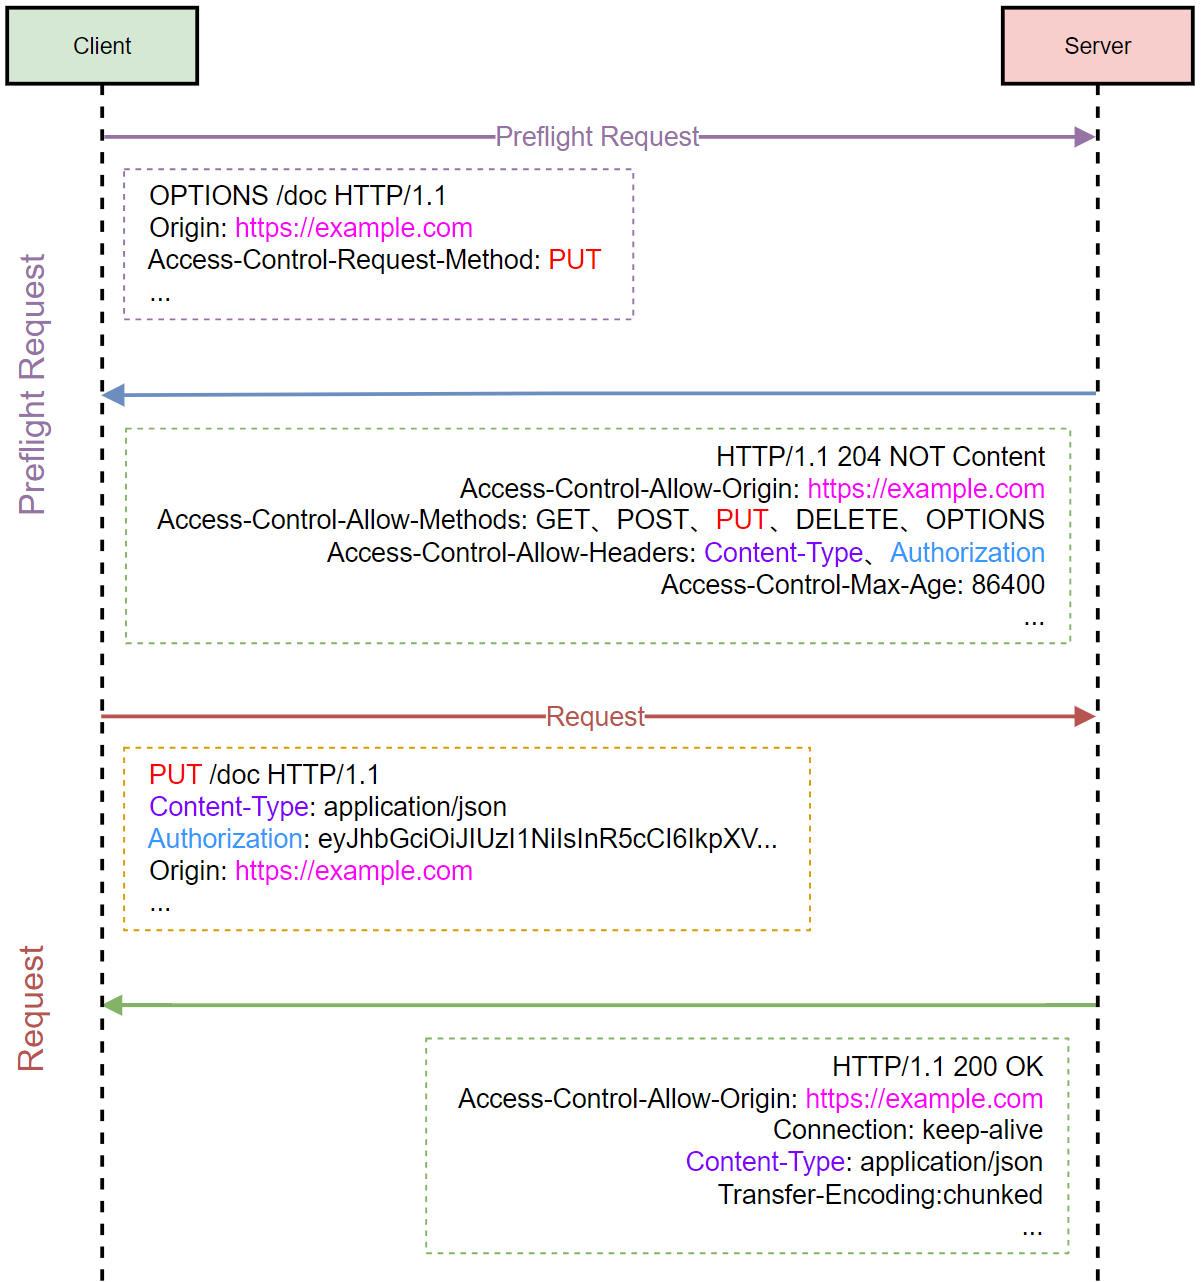
预检请求(Preflight Request) 是一种 HTTP OPTIONS 请求 ,用于检查服务器是否允许实际的请求方法和 HTTP 请求头(Header)。
浏览器静默发出 OPTION 请求,并且携带 Origin 和 Access-Control-Request-Method 等头信息询问服务器,然后服务器响应返回所有允许的请求条件给浏览器。当浏览器判断发出的请求不满足预检请求返回的条件时,则提示预检请求错误。
为了模拟服务器的 API 请求,我们使用 NodeJS 启动两个服务,同时为了通过预检请求,我们为其添加 HTTP 头部信息。
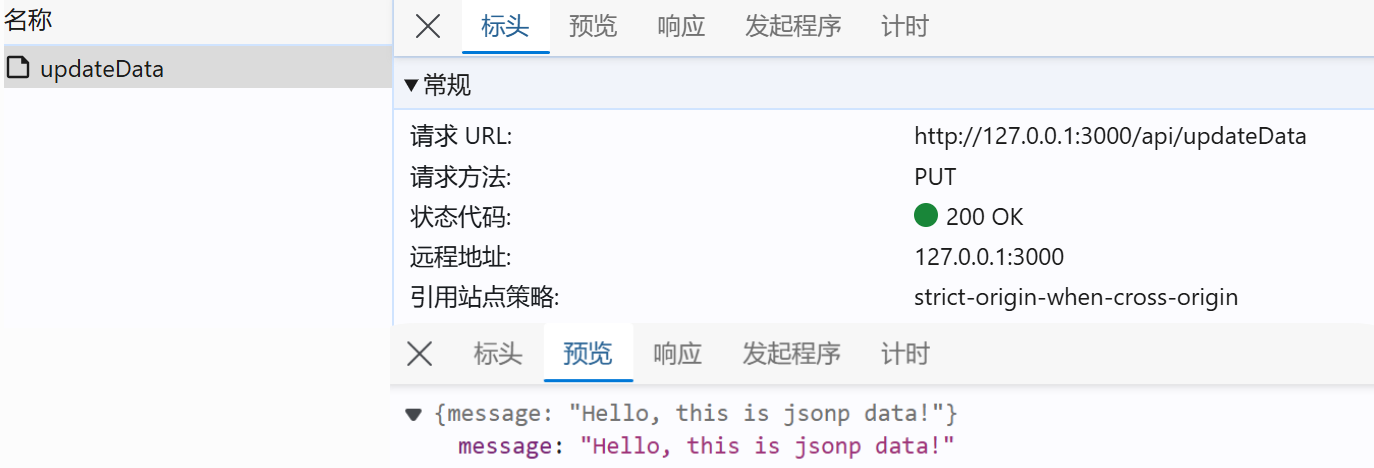
1
2
3
4
5
6
7
8
9
10
11
12
13
14
15
16
17
18
19
20
21
22
23
24
25
26
27
28
29
30
31
32
33
34
35
36
37
38
39
40
41
42
43
44
45
46
47
48
49
50
51
52
53
54
55
56
57
58
59
60
61
62
63
64
65
66
67
68
69
70
71
72
73
const http = require ("http" );const fs = require ("fs" );const path = require ("path" );const url = require ("url" );const filepath = path.resolve (__dirname, "./" );const readFileAndRespond = (req, res ) => {readFile (filepath + req.url , (err, data ) => {if (err) {writeHead (404 , { "Content-Type" : "text/plain" });end ("File not found" );return ;write (data);end ();const writeJSONAndRespond = (req, res ) => {const { pathname } = url.parse (req.url , true );const reqMethod = ["GET, POST, PUT, DELETE, OPTIONS" ];if (pathname !== "/api/updateData" || reqMethod.includes (req.method )) {writeHead (400 , { "Content-Type" : "text/plain" });end ("Error: No API provided." );return ;const data = { message : "Hello, this is cors data!" };const jsonData = JSON .stringify (data);setHeader ("Access-Control-Allow-Origin" , "http://localhost:3000" );setHeader ("Access-Control-Allow-Methods" , "GET, POST, PUT, DELETE, OPTIONS" );setHeader ("Access-Control-Allow-Headers" , "Content-Type, Authorization" );setHeader ("Access-Control-Max-Age" , "86400" );end (jsonData);const createServer = (hostname, port, filename ) => {const server = http.createServer ((req, res ) => {readFileAndRespond (req, res);listen (port, hostname, () => {console .log (`File server running at http://${hostname} :${port} /${filename} ` );const createApiServer = (hostname, port ) => {const server = http.createServer ((req, res ) => {writeJSONAndRespond (req, res);listen (port, hostname, () => {console .log (`API server running at http://${hostname} :${port} /api/updateData` );createServer ("localhost" , 3000 , "index.html" );createApiServer ("localhost" , 8080 );const childProcess = require ("child_process" );exec (`start http://localhost:3000/index.html` );
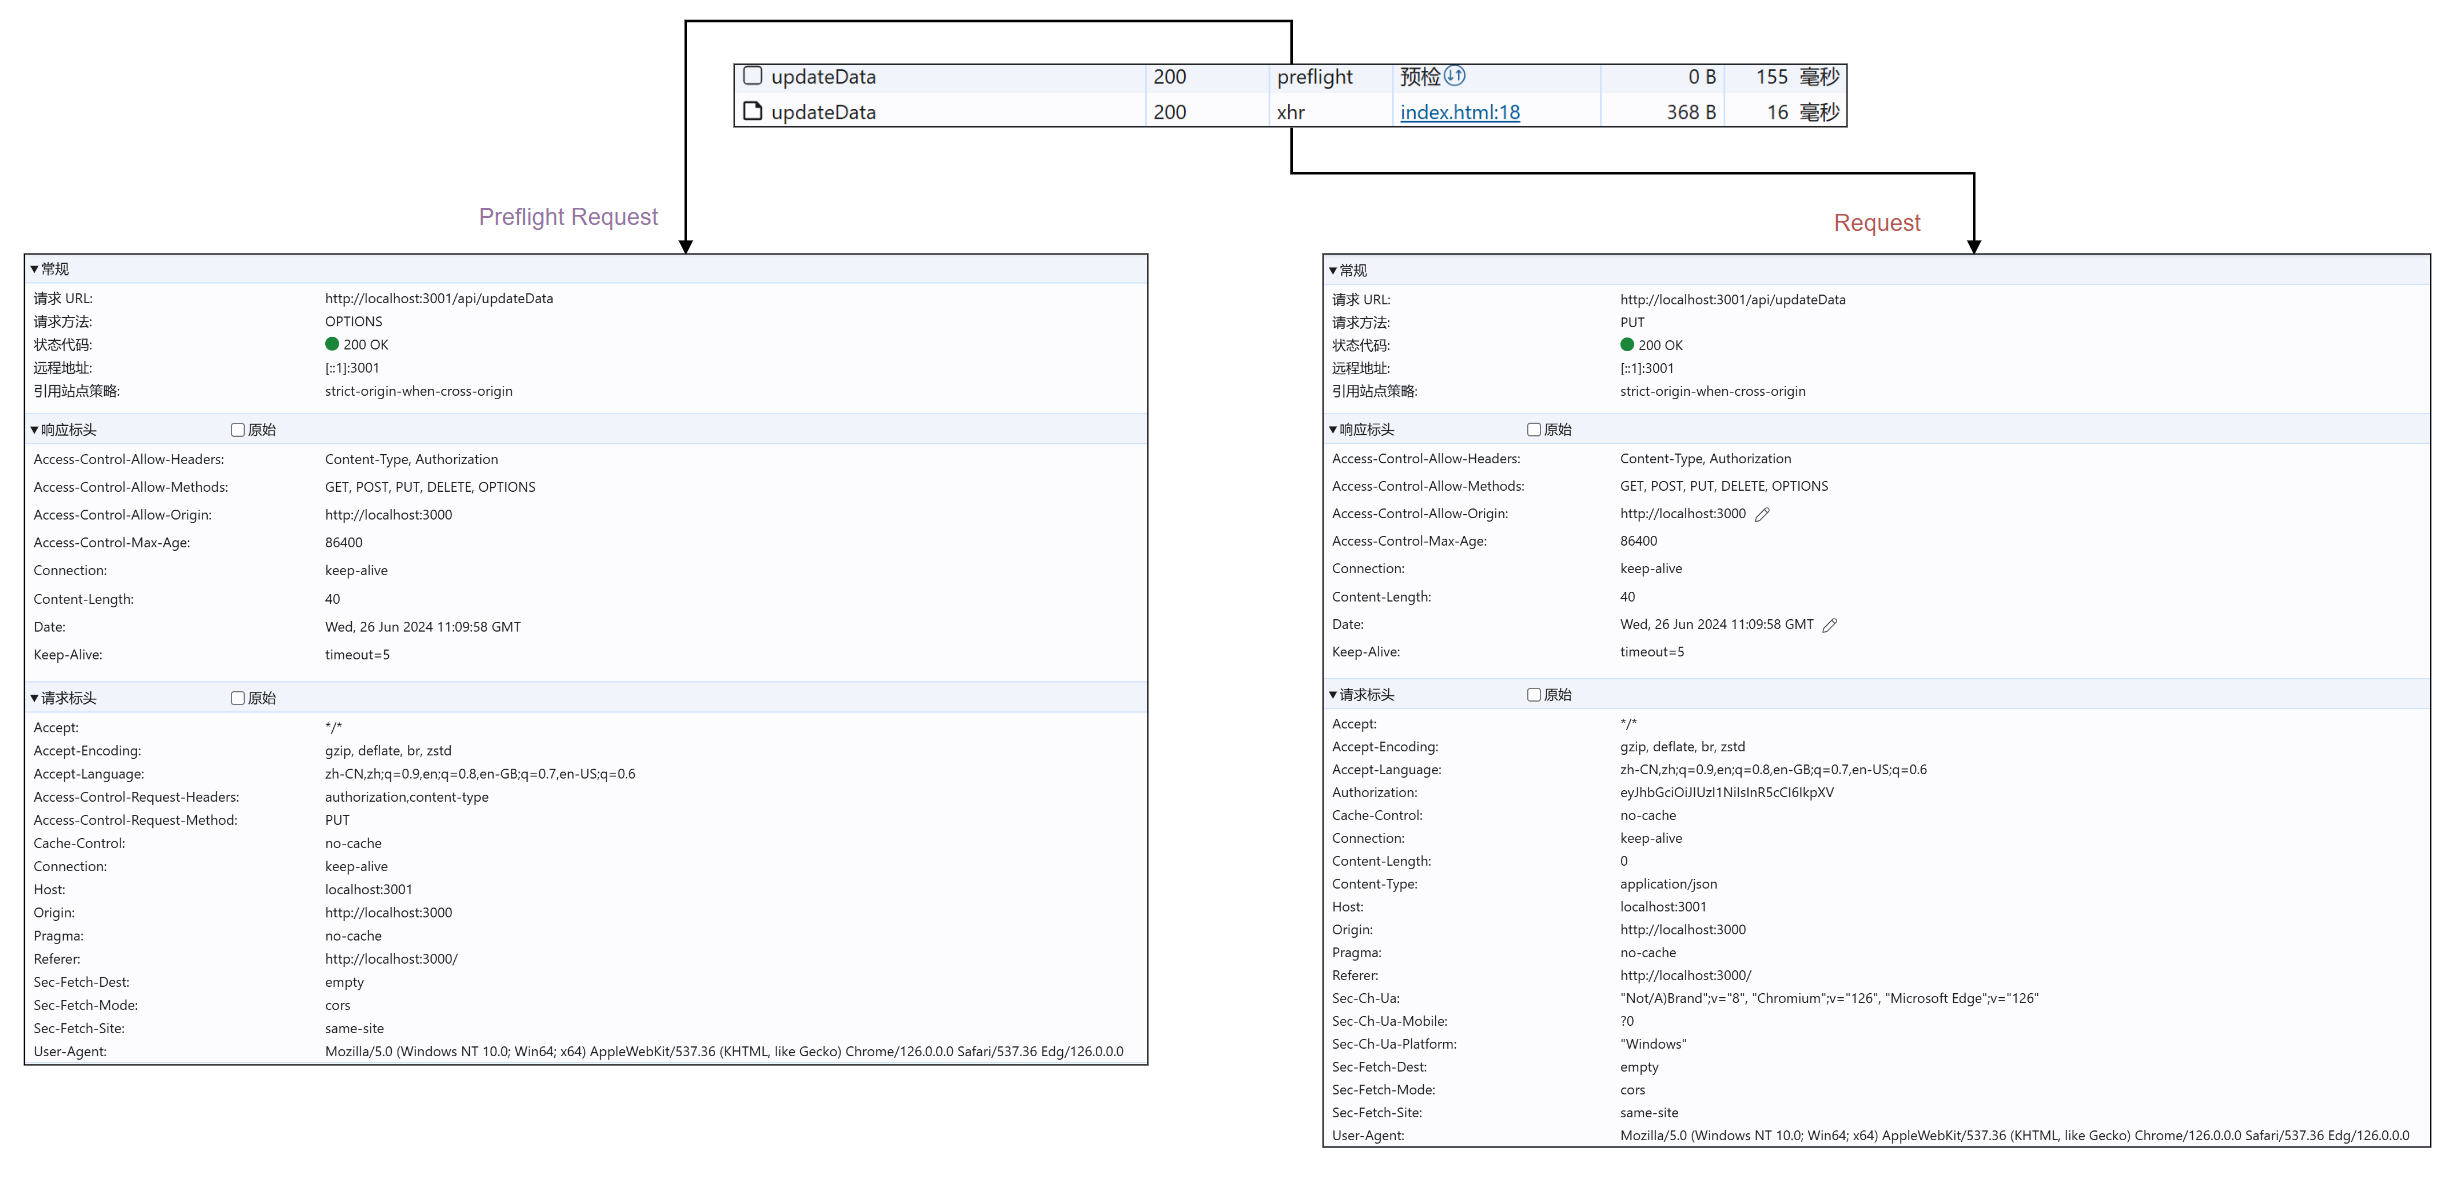
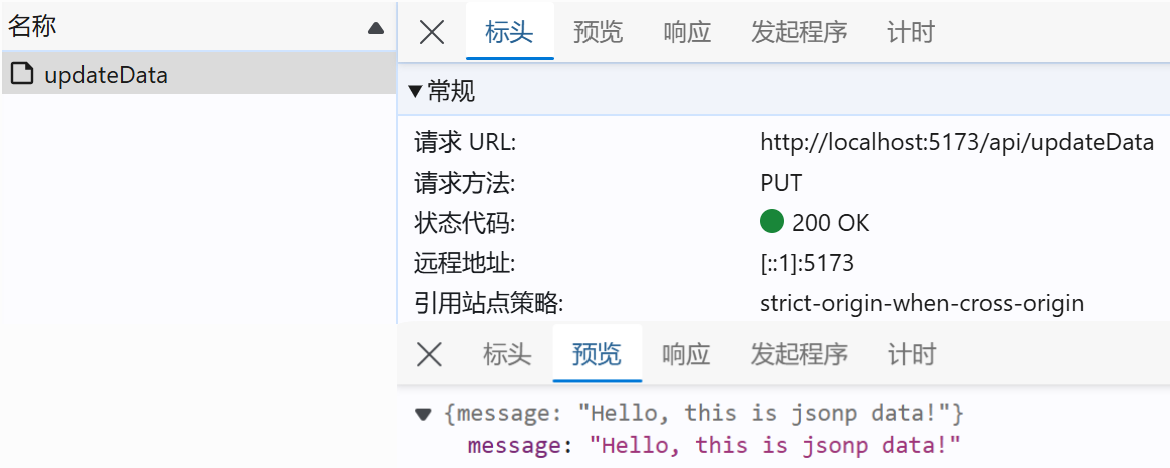
在界面中我们使用 XMLHttpRequest 向服务器发起一个 PUT 请求。
1 2 3 4 5 6 7 8 9 10 <body > <div > localhost:3000, please check the console for the API request</div > <script > const xhr = new XMLHttpRequest (); xhr.open ('PUT' , 'http://localhost:8080/api/updateData' , true ); xhr.setRequestHeader ('Authorization' , 'eyJhbGciOiJIUzI1NiIsInR5cCI6IkpXV' ); xhr.setRequestHeader ('Content-Type' , 'application/json' ); xhr.send (); </script > </body >
当在服务器设置了主要的 Access-Control-Allow-Origin、Access-Control-Allow-Methods、Access-Control-Allow-Headers HTTP 头部信息时,对应的预检请求就能成功通过。其中我们还能指定 Access-Control-Max-Age 头部信息告知浏览器在特定时间内缓存预检请求,减少发起预检请求。
同时,我们还能发现预检请求会比普通请求花费的时间更多,这也是为什么浏览器将请求划分为简单请求和非简单请求的原因之一。
CORS 跨源方式需要前端协调后端设置 HTTP 请求头,是浏览器提供的一种最为安全可靠的跨源方法。但在如今前后端分离的开发模式下,这种方法并不好维护。
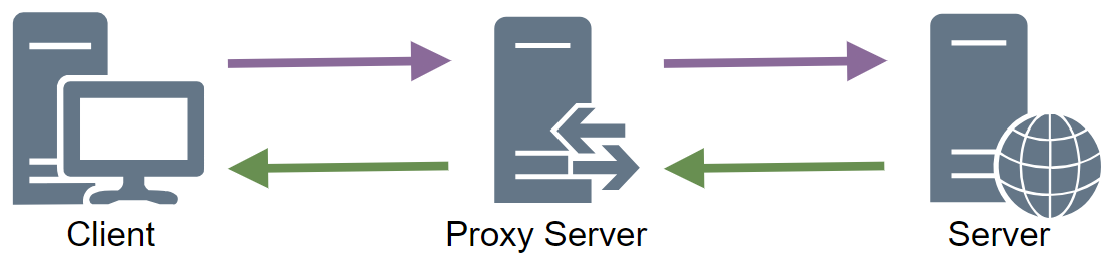
Proxy Server 代理服务器(Proxy Server) 是网络请求之间的中间人,能够接收客户端的请求,将其转发到目标服务器,最终将结果返回给客户端。
浏览器的跨源拦截只对浏览器端的请求存在限制,并不会服务器与服务器之间的通信不会受到限制,所以我们就可以借助代理服务器实现请求的通信。
为了模拟服务器的 API 请求,我们首先使用 NodeJS 启动一个服务,运行再在 localhost:8080,作为目标服务器。
1
2
3
4
5
6
7
8
9
10
11
12
13
14
15
16
17
18
19
20
21
22
23
24
25
26
27
28
29
30
31
const http = require ("http" );const url = require ("url" );const writeJSONAndRespond = (req, res ) => {const { pathname } = url.parse (req.url , true );if (pathname !== "/api/updateData" || req.method !== "PUT" ) {writeHead (400 , { "Content-Type" : "text/plain" });end ("Error: No API provided." );return ;const data = { message : "Hello, this is proxy server data!" };const jsonData = JSON .stringify (data);end (jsonData);const createApiServer = (hostname, port ) => {const server = http.createServer ((req, res ) => {writeJSONAndRespond (req, res);listen (port, hostname, () => {console .log (`API server running at http://${hostname} :${port} /api/updateData` );createApiServer ("localhost" , 8080 );
然后我们执行 node apiServer.js 命令,目标服务器就准备好了。
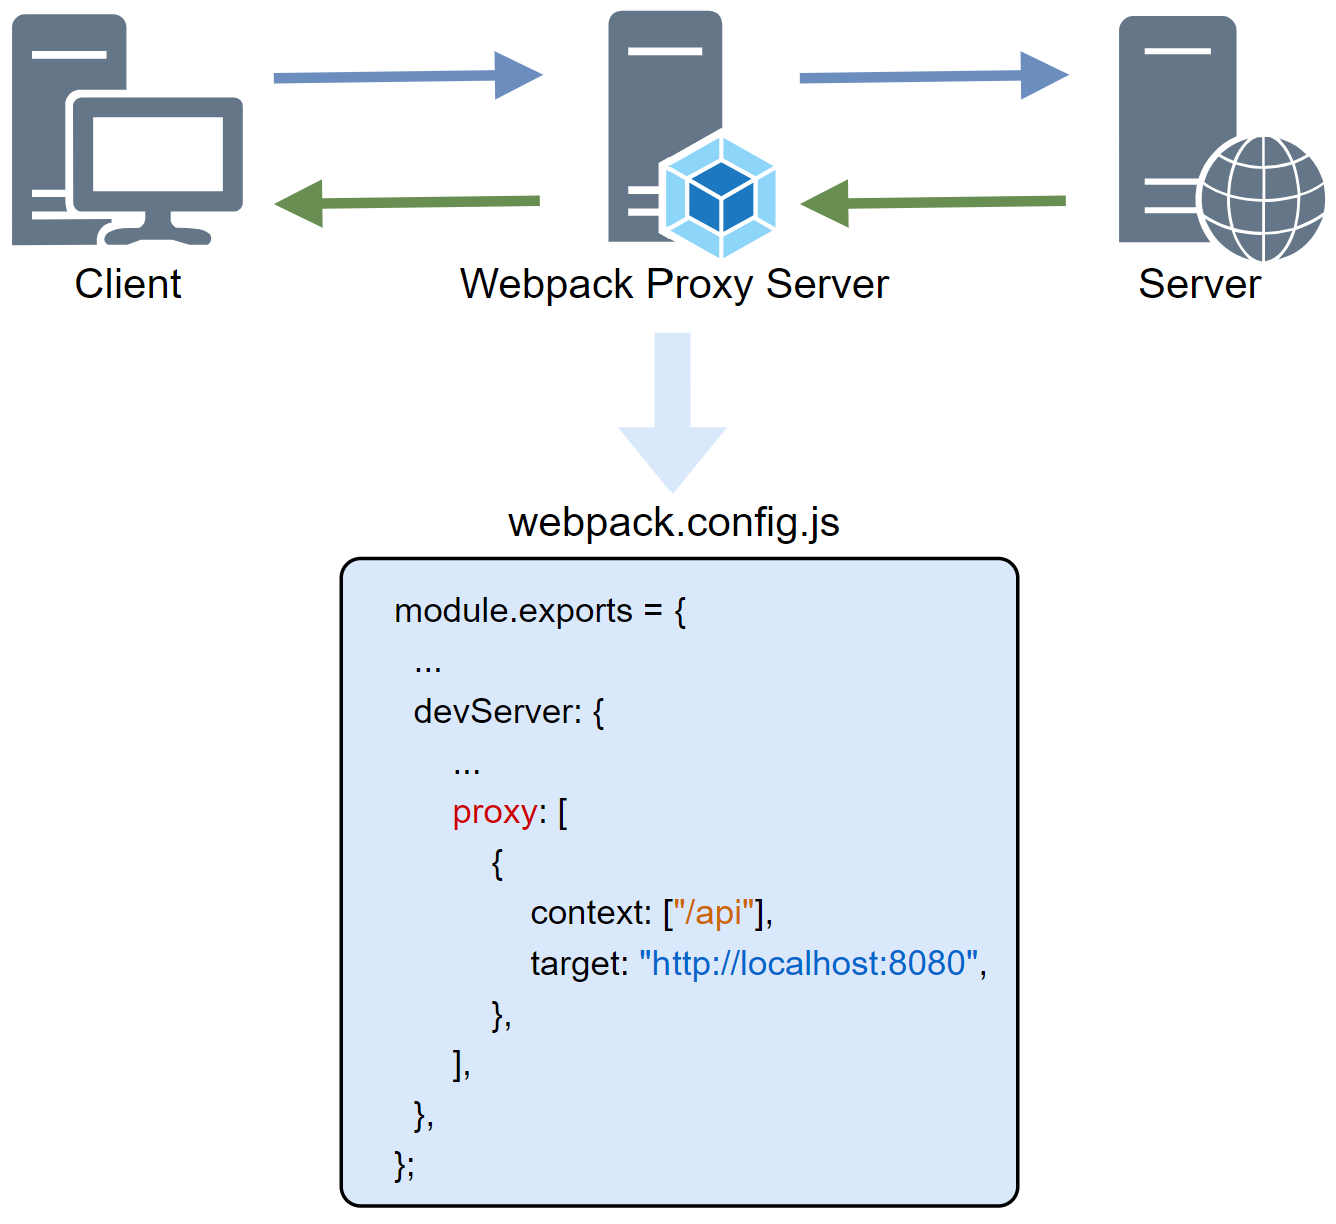
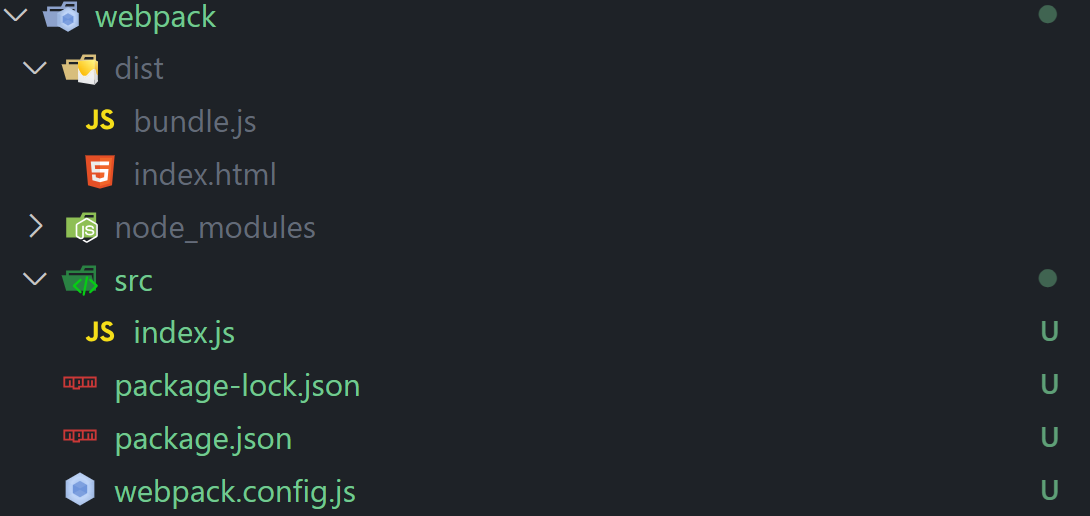
Webpack Webpack 是一个广泛使用的前端 JavaScript 模块化打包工具。它允许开发者将项目中的多个模块组织起来,通过加载器(loaders)和插件(plugins)进行转换和优化,最终生成一个或多个用于生产环境的静态资源包(bundles)。
我们先创建一个 webpack 项目,并且安装 webpack、webpack-cli 和 webpack-dev-server 工具。
1 npm install webpack webpack-cli webpack-dev-server ---save-dev
然后创建文件和完善配置,使项目结构如下:
同时,我们需要在 webpack.config.js 中为 webpack-dev-server 增加 proxy 配置。
1
2
3
4
5
6
7
8
9
10
11
12
module .exports = {devServer : {proxy : [context : ["/api" ],target : "http://localhost:8080" ,
然后我们在 src/index.js 中添加对目标服务器的请求,需要注意的是,请求不包含完整的协议、域名前缀,只填写接口路径,否则通过路径匹配的代理配置会失效。
1
2
3
4
const xhr = new XMLHttpRequest ();open ("PUT" , "/api/updateData" , true );onload = () => console .log (xhr.responseText );send ();
最后运行命令 npm run dev,然后我们能够看到请求成功响应,并且得到了数据。
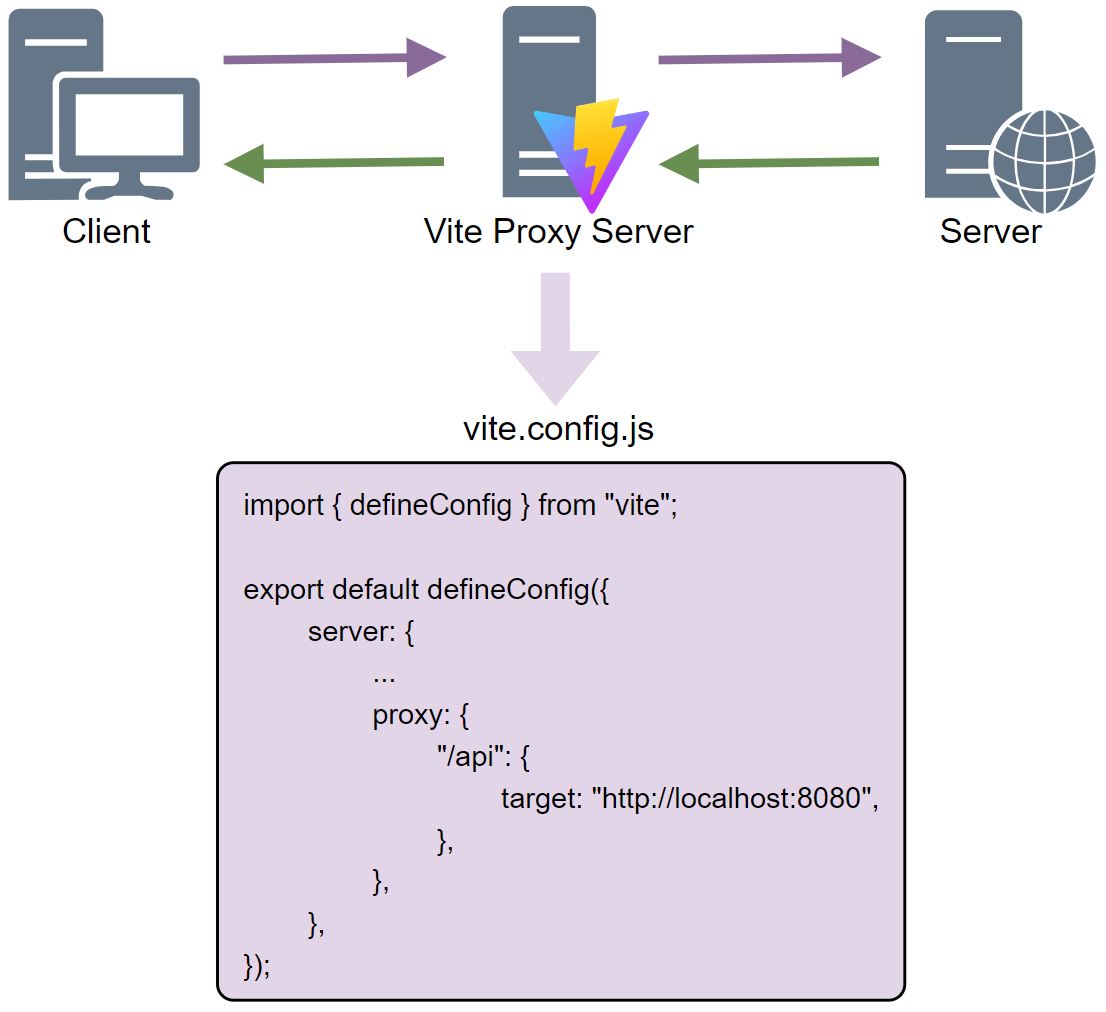
Vite Vite 是一个基于原生 ESModule 的轻量级前端开发和构建工具。Vite 在开发过程中提供了即时模块热替换(HMR),直接通过 ESModule 来加载和执行代码,这使得开发者无需像 Webpack 一样重新编译整个应用程序,只需要重新加载所更改的模块。
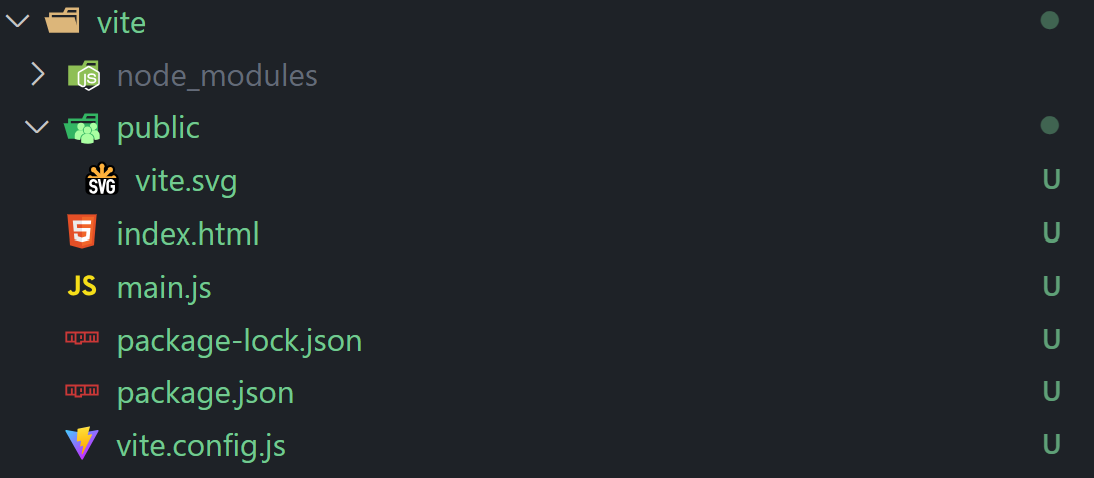
首先我们直接执行以下命令,选择创建一个原生(Vanilla)项目。
然后在原有示例项目基础上进行修改,使项目的结构如下:
同时,我们在 vite.config.js 中为其配置 proxy。
1
2
3
4
5
6
7
8
9
10
11
12
13
import { defineConfig } from "vite" ;export default defineConfig ({server : {proxy : {"/api" : {target : "http://localhost:8080" ,
然后,修改 main.js 中的代码,添加对目标服务器的请求,需要注意的是请求前缀不包含完整的协议、域名前缀,只填写接口路径,否则代理配置不生效。
1
2
3
4
5
6
7
8
document .querySelector ("#app" ).innerHTML = ` <div>Please check the console for the API request</div> ` ;const xhr = new XMLHttpRequest ();open ("PUT" , "/api/updateData" , true );onload = () => console .log (xhr.responseText );send ();
最后执行命令 npm run dev,我们就能够看到请求成功响应,并且得到了数据。
Node.js Node.js 是一个基于 Chrome V8 引擎的 JavaScript 运行时环境,它允许 JavaScript 在服务器端运行。
Node.js 不仅可以在 webpack 和 vite 中作为本地开发服务器,还可以作为开发环境的服务端。但是,与本地开发服务器代理不同的是,服务端代理可以在生产环境中生效。
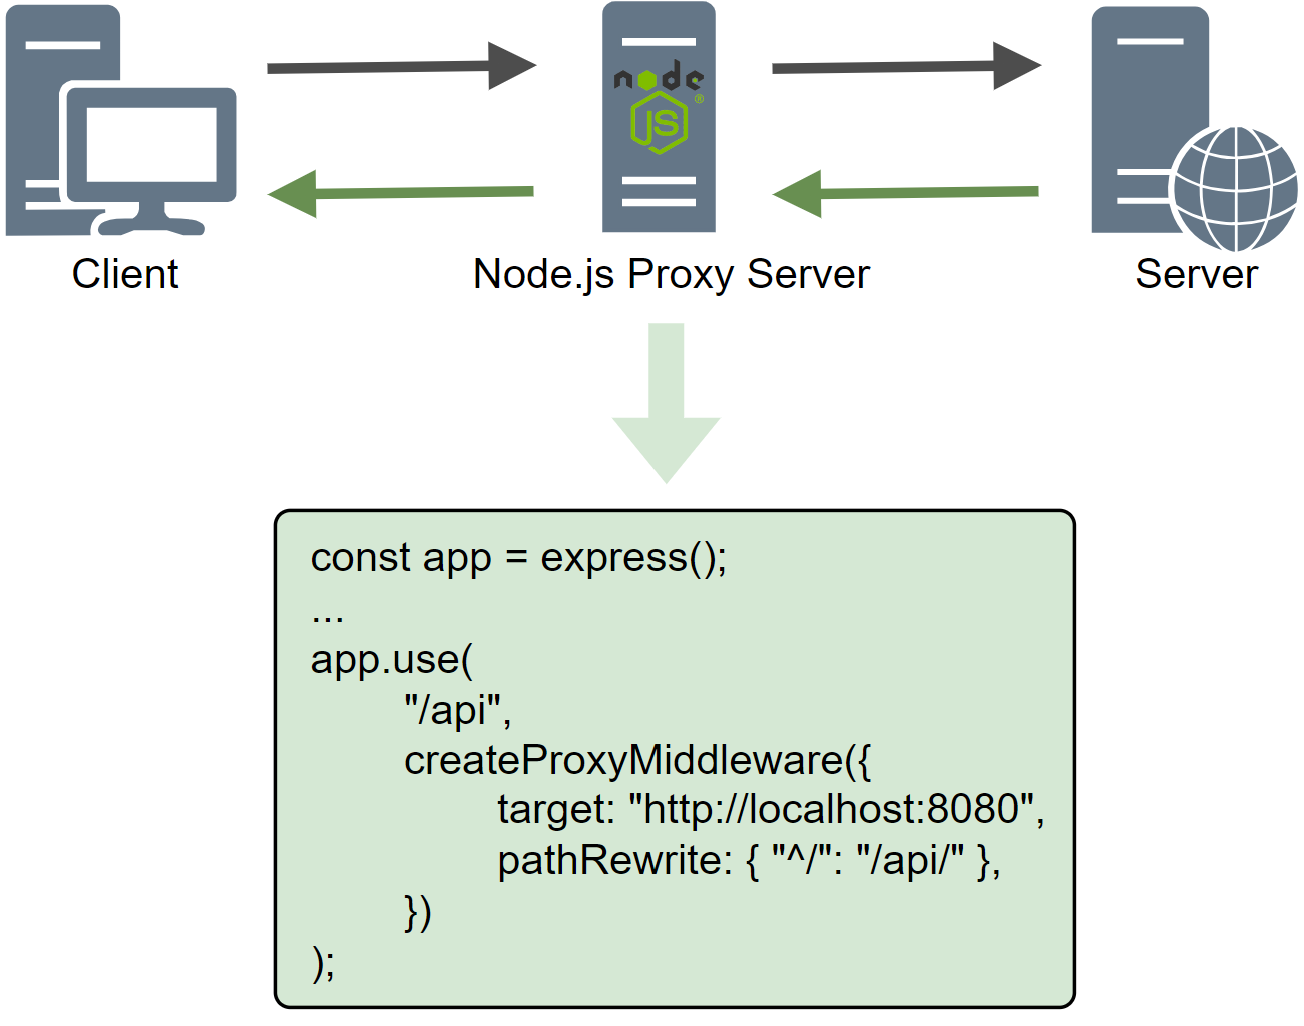
为了区别 Node.js 作为服务端,我们使用 express 创建一个服务端界面服务。
1
2
3
4
5
6
7
8
9
10
11
12
13
14
15
16
17
18
19
20
21
22
23
24
25
26
27
28
const path = require ("path" );const express = require ("express" );const { createProxyMiddleware } = require ("http-proxy-middleware" );const serverConf = {HOST : "127.0.0.1" ,PORT : 3000 ,TARGET : "http://localhost:8080" ,const { HOST , PORT , TARGET } = serverConf;const app = express ();use (express.static (path.join (__dirname, "public" )));use ("/api" ,createProxyMiddleware ({target : TARGET ,pathRewrite : { "^/" : "/api/" },listen (PORT , HOST , () => {console .log (`Server running at http://${HOST} :${PORT} /` );const childProcess = require ("child_process" );exec (`start http://${HOST} :${PORT} /index.html` );
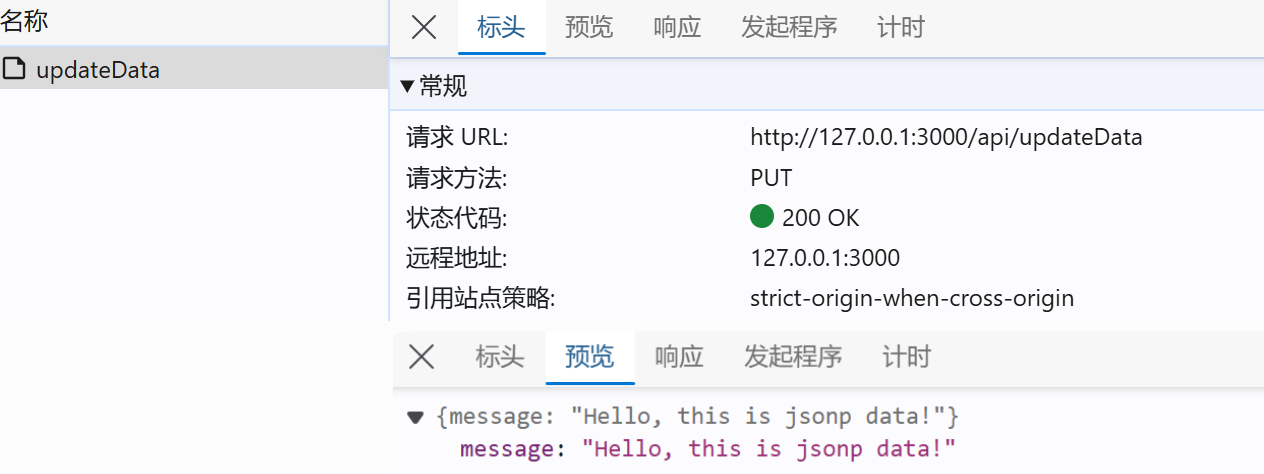
然后我们在 public/index.html 中发起请求
1 2 3 4 5 6 7 8 9 <body > <div > 127.0.0.1:3000</div > <script > const xhr = new XMLHttpRequest (); xhr.open ('PUT' , '/api/updateData' , true ); xhr.onload = () => console .log (xhr.responseText ); xhr.send (); </script > </body >
最后执行 node proxyServer.js,我们能够看到请求成功响应,并且得到了数据。
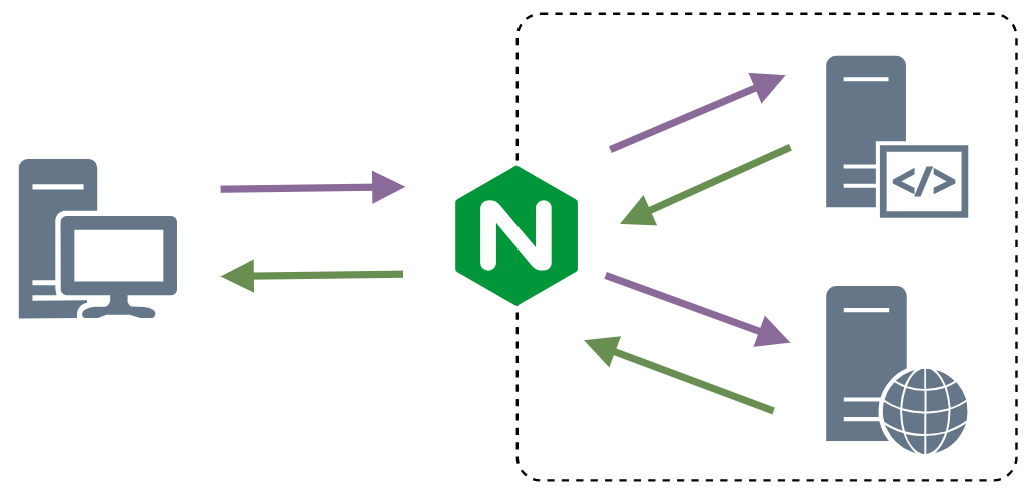
Nginx Nginx 是一个轻量级的 Web 服务器,能够作为 HTTP 和反向代理服务器 / 邮件代理服务器 / 通用 TCP/UDP 代理服务器。
假设我们有一个本地服务 127.0.0.1:3000,以及一个目标服务器 localhost:8080。
与其他跨域方法相同,本地服务的请求路径不包含完整的协议、域名前缀,只填写接口路径。
然后我们需要在 Nginx 的 conf/nginx.conf 中配置文件中进行以下配置:
1
2
3
4
5
6
7
8
9
10
11
12
13
14
15
http{
最后通过命令行 nginx,然后我们就能通过直接访问 localhost:80,通过代理将两个服务的请求合并在一起。
Nginx 作为代理服务器不需要更改原始项目的代码,这使得它成为生产环境中最常用的方法之一。
Websocket WebSocket 是一种网络通信协议,提供了一种在单个 TCP 连接上进行全双工通信的方式,能够在客户端和服务器之间建立持久连接,并且实时地交换数据。
这意味着客户端和服务器可以同时发送和接收数据,而不需要像 HTTP 那样每次通信都需要依靠客户端建立新的连接。
同时,浏览器对于该协议不实行同源政策,只要服务器支持,就可以通过它进行跨源通信。
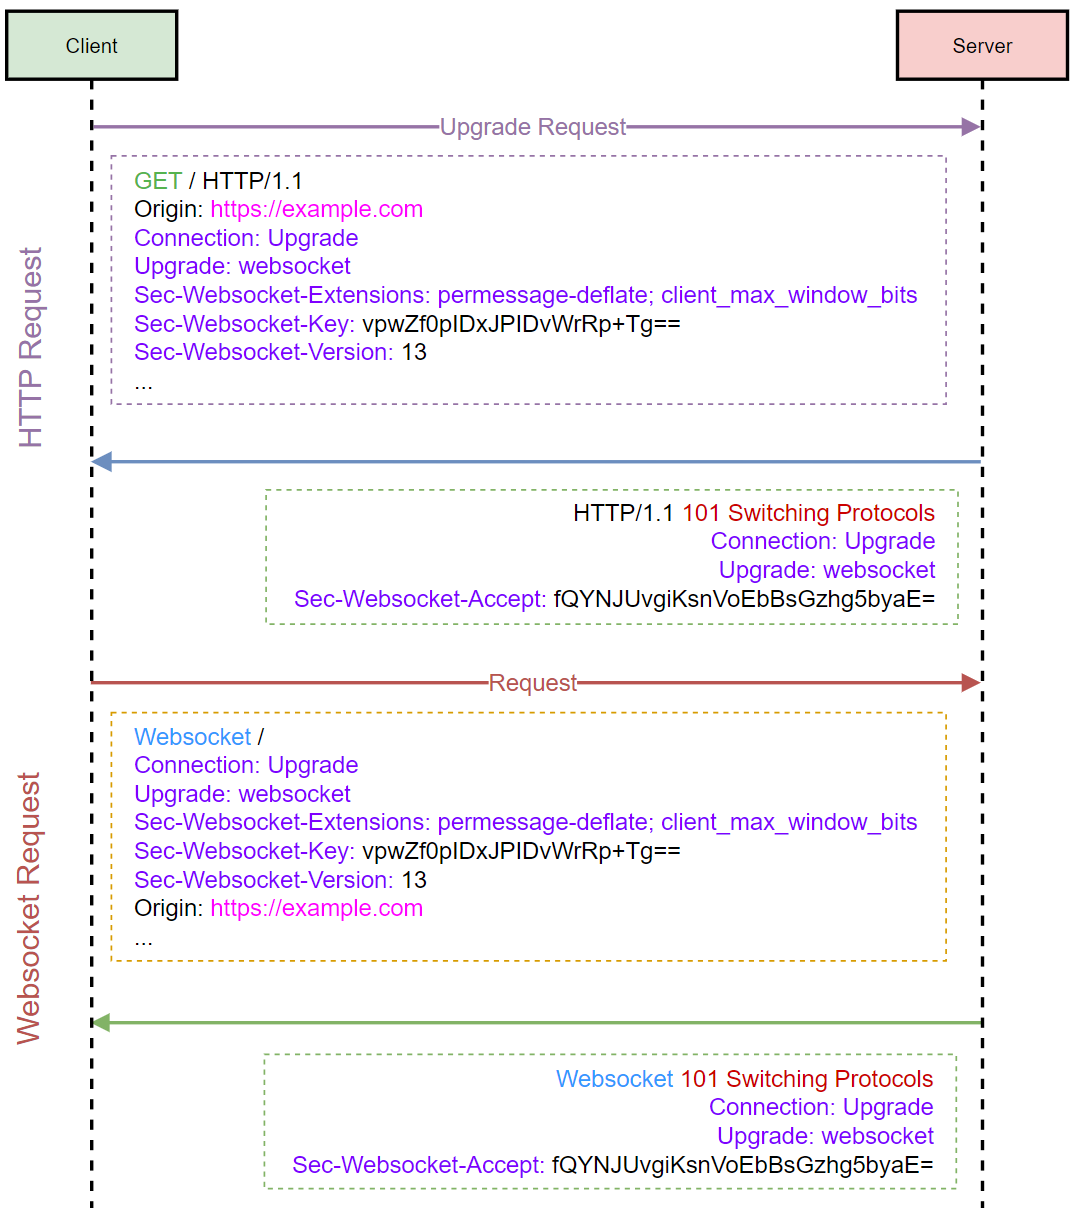
WebSocket 协议要求客户端和服务器端都支持 WebSocket 协议,并在握手阶段确认协议版本、支持的子协议、支持的扩展选项等。一旦握手完成,客户端和服务器之间就会建立起一个持久、双向的连接,客户端和服务器就可以实时地传递数据。这个连接会一直保持打开状态,直到客户端或服务器端主动关闭。
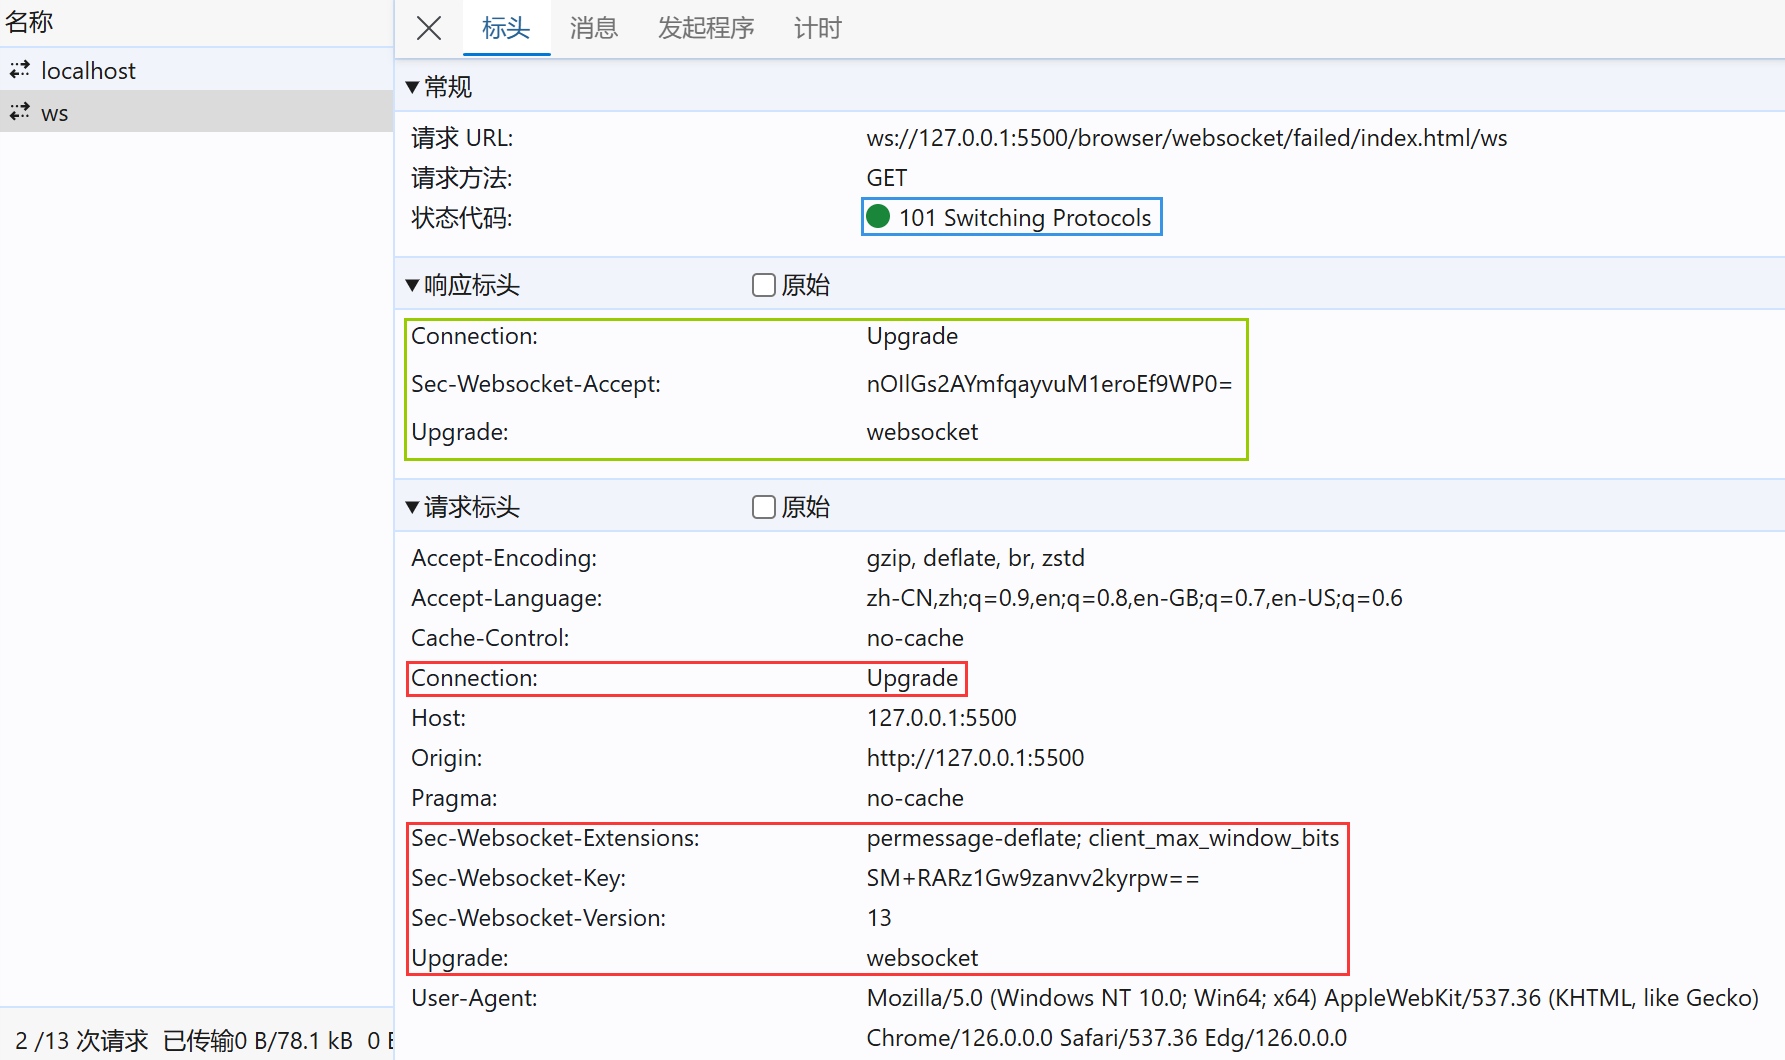
浏览器首先向目标服务器发送一个 HTTP 请求,请求头中包含 Upgrade: websocket 和 Connection: Upgrade 字段。这表示浏览器希望将连接升级到 WebSocket 协议。如果服务器支持 WebSocket,它会返回一个 HTTP 101 Switching Protocols 响应,确认协议升级,并且建立连接。
协议升级在后续的请求中不可见,所以我们可以请求一个不存在的 websocket 服务器,在浏览器中看到该请求
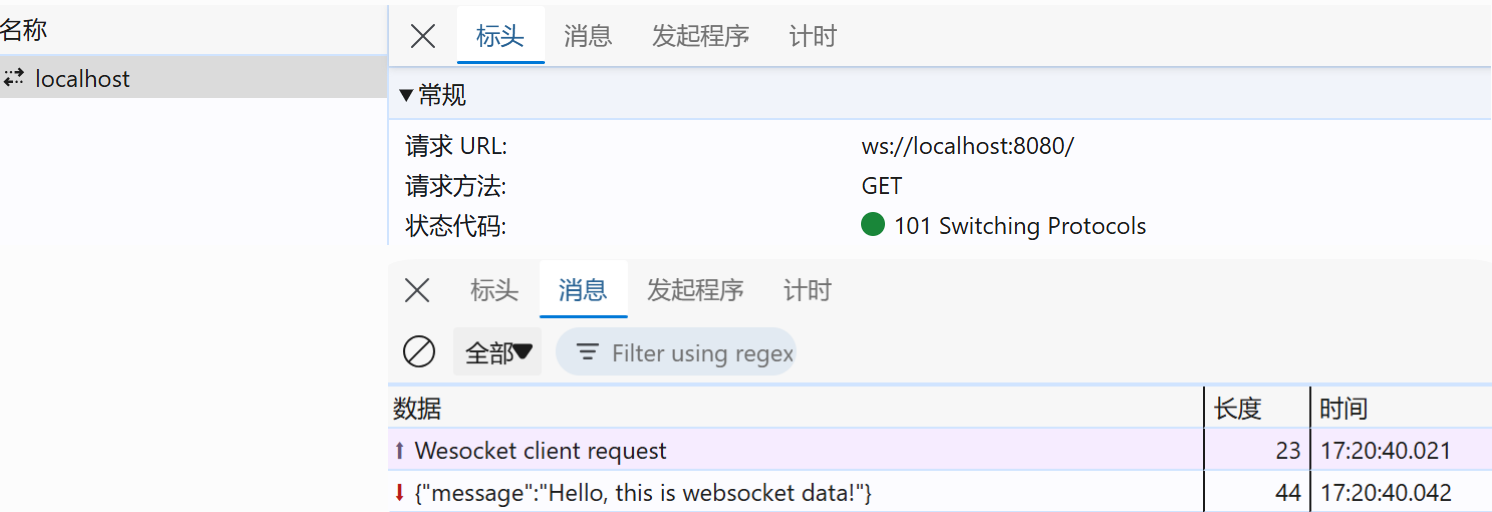
我们创建一个本地服务器和目标服务器,分别运行在 localhost:3000 和 localhost:8080,并且两种都使用 websocket 协议进行通信。
1
2
3
4
5
6
7
8
9
10
11
12
13
14
15
16
17
18
19
20
21
22
23
24
25
26
27
28
29
30
31
32
33
34
35
36
37
38
39
40
41
42
43
44
45
46
47
48
49
50
51
52
53
54
55
56
57
58
59
60
61
62
const http = require ("http" );const WebSocket = require ("ws" );const fs = require ("fs" );const path = require ("path" );const filepath = path.resolve (__dirname, "./" );const readFileAndRespond = (req, res ) => {readFile (filepath + req.url , (err, data ) => {if (err) {writeHead (404 , { "Content-Type" : "text/plain" });end ("File not found" );return ;write (data);end ();const createServer = (hostname, port, filename ) => {const server = http.createServer ((req, res ) => {readFileAndRespond (req, res);listen (port, hostname, () => {console .log (`[CLIENT] File server running at http://${hostname} :${port} /${filename} ` );const createWebsocketServer = (port ) => {const wss = new WebSocket .Server ({ port });console .log (`[WEBSOCKET SERVER] Start` );on ("connection" , (wss ) => {console .log (`[WEBSOCKET SERVER] connection` );on ("message" , (message ) => {console .log (`[WEBSOCKET SERVER] Received: ${message} ` );const data = { message : "Hello, this is websocket data!" };send (JSON .stringify (data));on ("close" , (code, reason ) => {console .log (`[WEBSOCKET SERVER] Connection closed: ${code} ${reason} ` );createServer ("localhost" , 3000 , "index.html" );createWebsocketServer (8080 );const childProcess = require ("child_process" );exec (`start http://localhost:3000/index.html` );
在界面中,我们需要使用 WebSocket 对象与服务器建立连接,向服务器发送和接收数据。
1 2 3 4 5 6 7 8 9 10 11 12 13 14 15 16 <body > <div > localhost:3000,please check the console for the API request</div > <script > const ws = new WebSocket ("ws:localhost:8080" ); ws.onopen = () => { console .log ('WebSocket connection establish.' ); ws.send ("Wesocket client request" ); } ws.onmessage = () => { console .log ('Receive the server message: ' , event.data ) ws.close (); }; ws.onerror = () => console .error ('WebSocket connection error: ' , event) ws.onclose = () => console .log ('WebSocket connection close.' ); </script > </body >
然后,浏览器再发起 Websocket 请求,发送信息到目标服务器,然后目标服务器传回数据。
与 HTTP 请求相比,WebSocket 连接会长时间保持打开状态,这会消耗服务器更多的资源。此外,虽然 WebSocket 支持通过 wss:// (WebSocket Secure) 使用 TLS 加密传输数据,但是仍然需要注意数据的加密和安全问题。
存储跨源共享 存储跨源的共享主要通过结合 DOM 跨源和请求跨源两种方法,将存储数据进行传递。
共享形式
存储数据
传递方法
页面共享
Cookie、Web Storage、IndexedDB
DOM 跨源共享
请求共享
Cookie
请求跨源共享
Cookie Cookie 是服务器发送到用户浏览器并保存在本地的一小块数据。浏览器会存储 cookie 并在下次向同一服务器再发起请求时携带并发送到服务器。
页面共享 页面共享指的是不同源页面之间共享 cookie 数据,当用户访问一个网站时,浏览器会存储该网站创建的 Cookie,这些 Cookie 用于跟踪用户会话、偏好和行为。
父子域名 在浏览器中,父域名和子域名之间默认共享 Cookie,这是因为早期浏览器认为子域名是父域名的一部分,因此它们可以共享 Cookie。
但是,这种共享方式可能会导致安全问题,因为如果父域名中的 Cookie 包含敏感信息,那么子域名就可以访问这些信息,从而导致安全问题。
不同域名 此外,我们还能通过 window.name、location.hash 和 window.postMessage 等。这些方法都是通过在不同域名下创建一个隐藏的 iframe,然后通过 iframe 之间的通信来实现跨域共享 Cookie。
但是,这些方法并不常见,因为它们比使用请求控制共享要复杂得多,并且可能会导致其他问题。
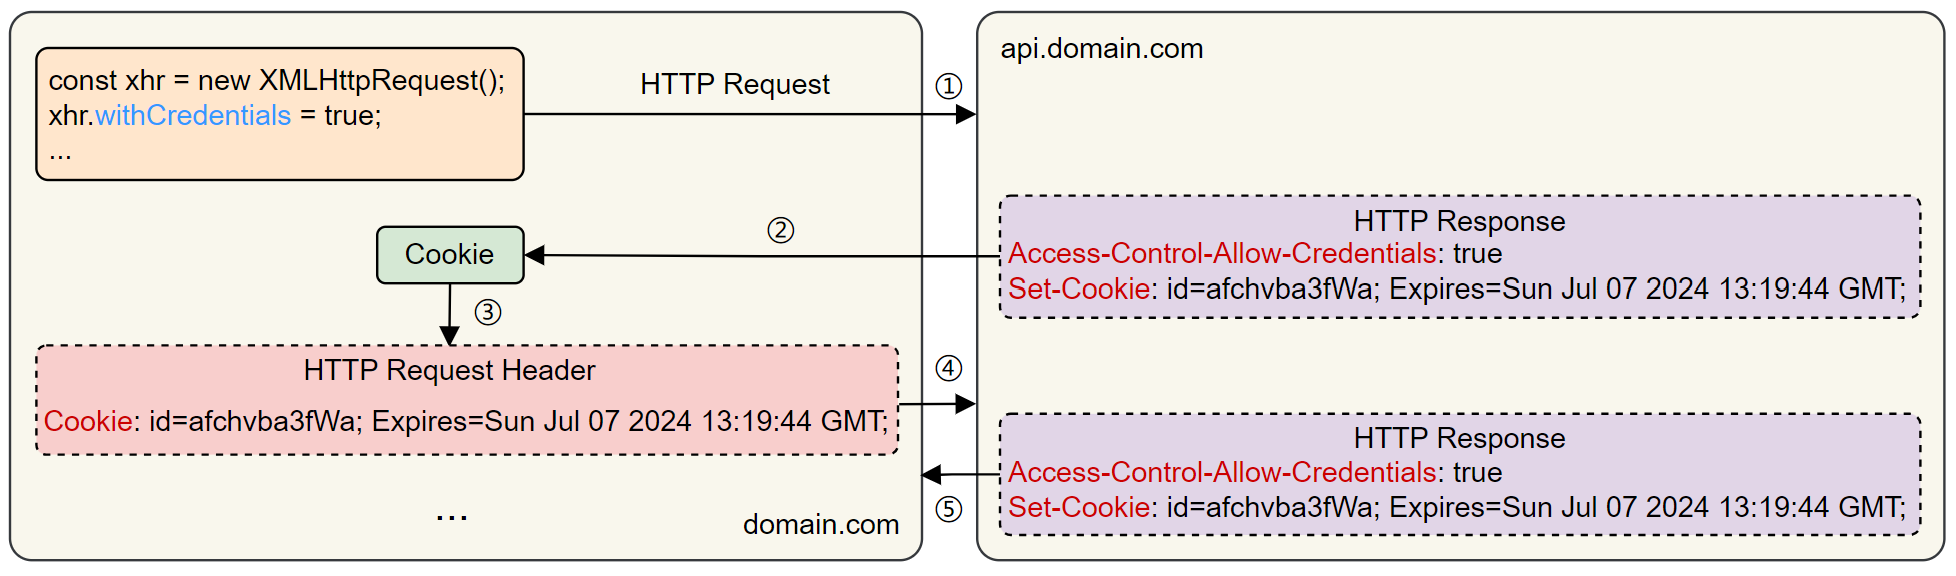
请求共享 当浏览器请求服务器时,如果服务器需要记录状态数据,就可以通过向响应头中添加一个或多个 Set-Cookie 选项,向浏览器发送一个 Cookie,而浏览器会把 Cookie 保存起来。
当再次请求服务器时,浏览器可以添加 withCredentials 请求头,允许携带跨源 Cookie 一同提交给服务器。服务器通过检查该 Cookie,就能得到该状态数据。
在同源请求中,Cookie 会被请求自动携带,而在跨源请求中,则需要添加额外的 withCredentials 请求头来允许请求自动携带 Cookie。
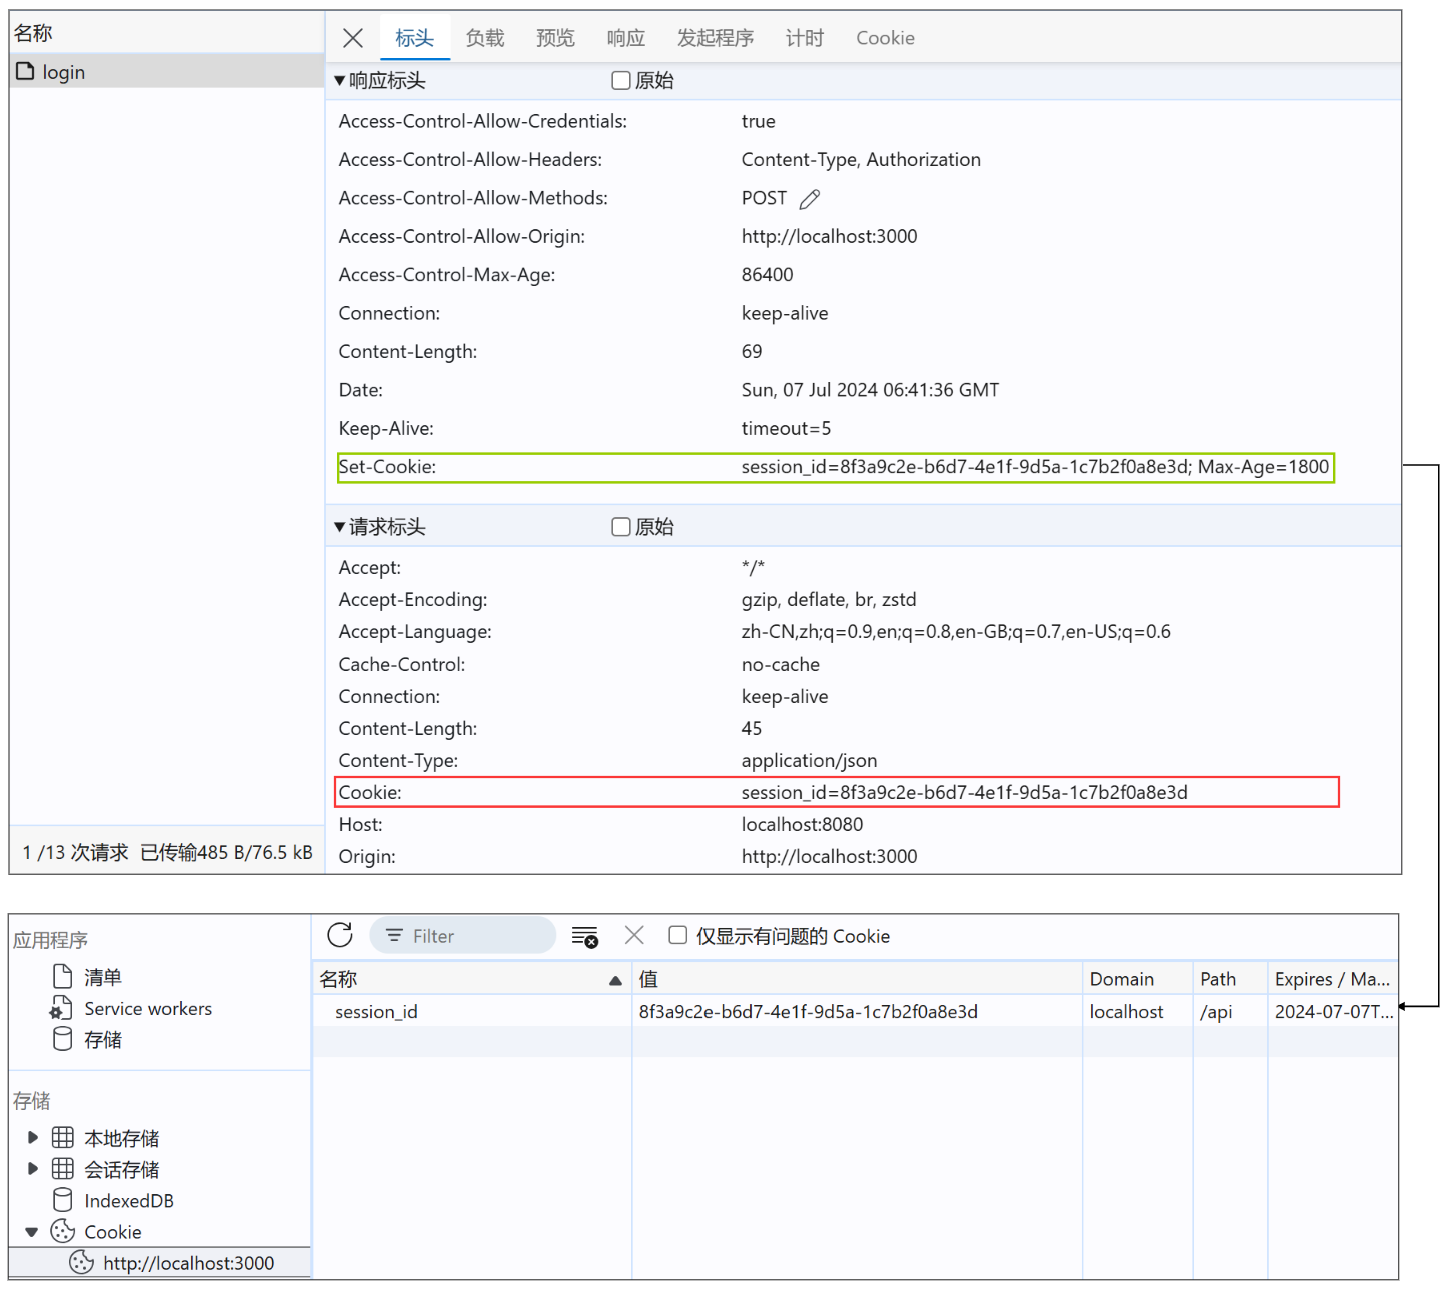
首先我们启动本地服务和目标 API 服务,分别运行在 localhost:3000 和 localhost:8080。同时,为了将目标服务器的 Cookie 发送到浏览器,我们需要在目标服务器的响应头中设置 Access-Control-Allow-Credentials 和 Set-Cookie 属性。
1
2
3
4
5
6
7
8
9
10
11
12
13
14
15
16
17
18
19
20
21
22
23
24
25
26
27
28
29
30
31
32
33
34
35
36
37
38
39
40
41
42
43
44
45
46
47
48
49
50
51
52
53
54
55
56
57
58
59
60
61
62
63
64
65
66
67
68
69
70
71
72
73
74
75
76
const http = require ("http" );const fs = require ("fs" );const path = require ("path" );const url = require ("url" );const filepath = path.resolve (__dirname, "./" );const readFileAndRespond = (req, res ) => {readFile (filepath + req.url , (err, data ) => {if (err) {writeHead (404 , { "Content-Type" : "text/plain" });end ("File not found" );return ;write (data);end ();const writeJSONAndRespond = (req, res ) => {const { pathname } = url.parse (req.url , true );const reqMethod = ["POST" , "OPTIONS" ];if (pathname !== "/api/login" || !reqMethod.includes (req.method )) {writeHead (400 , { "Content-Type" : "text/plain" });end ("Error: No API provided." );return ;setHeader ("Access-Control-Allow-Origin" , "http://localhost:3000" );setHeader ("Access-Control-Allow-Methods" , "POST" );setHeader ("Access-Control-Allow-Headers" , "Content-Type, Authorization" );setHeader ("Access-Control-Max-Age" , "86400" );setHeader ("Access-Control-Allow-Credentials" , true );setHeader ("Set-Cookie" , "session_id=8f3a9c2e-b6d7-4e1f-9d5a-1c7b2f0a8e3d" );const data = { code : 0 , data : { token : "eyJhbGciOiJIUzUxMiIsInR5cCI6IkpXVCJ9..." } };const jsonData = JSON .stringify (data);end (jsonData);const createServer = (hostname, port, filename ) => {const server = http.createServer ((req, res ) => {readFileAndRespond (req, res);listen (port, hostname, () => {console .log (`File server running at http://${hostname} :${port} /${filename} ` );const createApiServer = (hostname, port ) => {const server = http.createServer ((req, res ) => {writeJSONAndRespond (req, res);listen (port, hostname, () => {console .log (`API server running at http://${hostname} :${port} /api/login` );createServer ("localhost" , 3000 , "index.html" );createApiServer ("localhost" , 8080 );const childProcess = require ("child_process" );exec (`start http://localhost:3000/index.html` );
然后在请求中,我们还需要设置 withCredentials 请求头属性为 true
1 2 3 4 5 6 7 8 9 10 11 12 13 14 <body > <div > localhost:3000, please check the console for the API request</div > <script > const data = { username : 'username' , password : 'password' }; const xhr = new XMLHttpRequest (); xhr.open ('POST' , 'http://localhost:8080/api/login' , true ); xhr.setRequestHeader ('Content-Type' , 'application/json' ); xhr.withCredentials = true ; xhr.onload = () => console .log (JSON .parse (xhr.responseText )); xhr.send (JSON .stringify (data)); </script > </body >
当请求完成时,我们就能够在浏览器的本地存储中看到服务器传递的 Cookie 值,并且第二次发起请求时,请求中会自动携带来自服务器的 Cookie 值。
Web Storage 和 IndexedDB Web Storage 和 IndexedDB 是两种用于在浏览器存储数据的技术。
在页面共享中,两者都能够通过 DOM 的跨源方法实现存储数据的传递。
在请求共享中,并没有提供行之有效的共享方式,但是对于较小的数据量,通过 Cookie 共享也是一种可行的传递方式。
结语 至此,我们完整地梳理了前端中的跨源方法,并深入探讨了这些技术的优缺点。在实际开发过程中,我们需要根据具体场景和需求,选择合适的方法来实现跨源数据的交互。
本篇博客的涉及的所有代码示例已存档,你可以在此处 找到相关的代码示例。